Achieving tear-out-free cuts with a miter saw requires a combination of a sharp, high-tooth-count blade (60-80 teeth), proper workpiece support using a sacrificial fence, and a slow, controlled cutting technique. This approach minimizes splintering and chipping, ensuring clean, precise cuts while maintaining essential safety standards for woodworking and DIY projects.
Understanding Miter Saw Tear-Out and Its Causes
Miter saw tear-out is the splintering or chipping of wood fibers, typically on the exit side of a cut. This occurs when the saw blade’s teeth rip wood fibers instead of cleanly slicing them, resulting in jagged edges and an imperfect finish. Tear-out not only detracts from a project’s appearance but can also weaken joints and necessitate additional rework.
Several factors contribute to tear-out. A primary cause is a dull or incorrect saw blade; a sharp blade with appropriate tooth geometry and count is crucial. Insufficient workpiece support, where the wood vibrates or shifts, also causes fiber tearing. Improper cutting technique, such as forcing the blade too quickly or raising it before it stops spinning, exacerbates the issue. Softer or highly fibrous woods are also more susceptible to tear-out. For compare top miter saws on this site.
Essential Steps to Prevent Miter Saw Tear-Out
Preventing tear-out involves proper equipment, technique, and preparation. By addressing these areas, you can significantly reduce splintering and achieve consistently clean cuts. Focusing on the blade, workpiece support, and your cutting approach forms the cornerstone of this prevention strategy.
Choosing the Right Blade for Clean Cuts
The saw blade is the most critical component for preventing tear-out. Select a high-quality, sharp blade designed for fine crosscuts. For crosscutting wood, look for blades with 60 to 80 teeth, as these provide a smoother cut. An Alternate Top Bevel (ATB) grind is excellent for crosscutting, as it scores and severs wood fibers cleanly. A blade with a negative hook angle is also recommended for miter saws, as it pushes the workpiece down, enhancing safety and reducing tear-out. Regularly inspect your blade for sharpness and replace or sharpen it when you notice dullness.
Proper Workpiece Support and Clamping
Adequate support for your workpiece is fundamental for tear-out-free cuts and safety. Unsupported wood can vibrate or lift, leading to splintering. Use a sacrificial fence or a backer board, which is a piece of scrap wood clamped to your miter saw’s fence. The blade cuts into this fence, providing support to wood fibers at the cut line, especially on the exit side where tear-out is common. This effectively closes the zero-clearance gap around the blade. For smaller pieces, securely clamp them to the saw table and against the fence; never rely solely on hand-holding.
 Miter saw with a wooden backer board preventing tear-out on a lumber piece
Optimizing Cutting Technique
Even with the best blade and support, poor technique can cause tear-out. Make slow, controlled cuts, allowing the blade to work without forcing it. Always let the miter saw blade reach its full rotational speed before starting the cut. Apply steady, consistent pressure as you bring the blade down. Once the cut is complete, keep the blade fully depressed until it stops spinning before raising it. Lifting a still-spinning blade can cause significant tear-out and is a safety risk. For delicate materials, some woodworkers score the cut line first with a utility knife to pre-sever fibers.
Material Considerations
Understanding the characteristics of the wood you are cutting helps prevent tear-out. Softwoods like pine are fibrous and splinter easily, requiring extra care. Hardwoods such as oak are denser and generally produce cleaner cuts but can still tear out if not properly supported or if the blade is dull. Be mindful of the wood’s grain direction. While miter saws are designed for crosscutting, areas with angled grain or knots are more prone to tear-out. In these cases, take slower cuts or reinforce the area with painter’s tape.
Enhancing Miter Saw Safety Practices
Safety is paramount in woodworking, especially with powerful machinery like a miter saw. Robust safety practices protect you from injury and contribute to better quality cuts by allowing you to focus on technique. A safe workspace and properly maintained tools go hand-in-hand with effective tear-out prevention.
Personal Protective Equipment (PPE)
Always wear appropriate personal protective equipment when operating a miter saw. Safety glasses are essential to protect against flying sawdust and wood chips. Hearing protection, such as earmuffs or earplugs, is crucial to prevent permanent hearing damage from high noise levels. A dust mask can protect your respiratory system from fine dust. Wear appropriate clothing, avoid loose garments, and tie back long hair to prevent entanglement with moving parts.
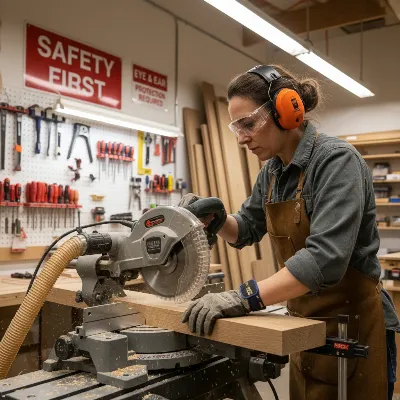 A person safely operating a miter saw with appropriate PPE and a clean setup
Machine Setup and Maintenance
A well-maintained and correctly set up miter saw is crucial for safety and performance. Before each use, inspect the saw: ensure the blade is installed and tightened correctly, with teeth pointing towards the fence. Check that all guards function and the fence is square to the blade. Regularly clean sawdust and debris from vents, guards, and the table. Always unplug the saw before any adjustments, blade changes, or maintenance to prevent accidental startups.
Work Area Ergonomics
Your workspace should be clear, well-lit, and free of clutter. Place your miter saw on a stable, level surface, such as a dedicated stand or workbench. Use extendable supports for long workpieces to prevent tipping and ensure full support. Maintain a clear area around the saw to avoid tripping. Adopt a comfortable, stable stance, keeping your body to one side of the blade’s path. Keep hands away from the blade, using push sticks or clamps for small pieces. Never reach over the saw or clear sawdust while the blade is spinning. A clear head and organized environment minimize accident and tear-out risks.
Miter Saw Tear-Out: Troubleshooting Common Scenarios
Even with precautions, tear-out can occur. When it does, diagnose the problem systematically. If your miter saw still tears out wood, re-evaluate your blade. Is it sharp? Is it the correct type for the material? Experiment with a higher tooth count blade or one designed for ultra-fine finishes. Double-check the blade’s rotation and installation. Next, scrutinize workpiece support. Are your sacrificial fence and clamps holding the material immovably? For thin veneers, painter’s tape along the cut line can provide reinforcement. Finally, review your technique. Are you allowing the blade to reach full speed? Is your feed rate slow and consistent? Sometimes, a shallow scoring pass followed by a deeper second pass helps with stubborn materials.
Conclusion
Mastering tear-out-free cuts with a miter saw combines the right tools, meticulous preparation, and refined technique. Prioritize a sharp, appropriate blade, implement robust workpiece support with sacrificial fences, and adopt a slow, controlled cutting approach to elevate project quality. Safety is intrinsic: wearing proper PPE, maintaining your saw, and ensuring a clear, ergonomic workspace are foundational to your well-being and work precision. Embrace these principles for consistently clean, professional-grade cuts in your woodworking journey.
What specific material challenges have you encountered with miter saw tear-out, and how have you overcome them?
Frequently Asked Questions
What blade is best to prevent tear-out on a miter saw?
For the cleanest, tear-out-free cuts on a miter saw, a high tooth count blade is recommended. Look for blades with 60 to 80 teeth, an Alternate Top Bevel (ATB) grind, and a negative hook angle. These features work together to score the wood fibers cleanly, reducing splintering, especially on delicate materials.
Can a dull blade cause tear-out?
Absolutely. A dull blade is one of the primary causes of tear-out. Instead of cleanly slicing through the wood fibers, dull teeth will rip and pull them, leading to rough, splintered edges. Regularly inspecting your blade for sharpness and replacing or sharpening it as needed is crucial for preventing tear-out and ensuring safe operation.
How does a sacrificial fence prevent tear-out?
A sacrificial fence, often a piece of scrap wood clamped to your miter saw’s fence, prevents tear-out by providing zero-clearance support directly at the point where the blade exits the workpiece. As the blade cuts into the sacrificial fence, it supports the wood fibers on the back side of your material, preventing them from blowing out or splintering as the blade passes through.
Frequently Asked Questions
What blade is best to prevent tear-out on a miter saw?
For the cleanest, tear-out-free cuts on a miter saw, a high tooth count blade is recommended. Look for blades with 60 to 80 teeth, an Alternate Top Bevel (ATB) grind, and a negative hook angle. These features work together to score the wood fibers cleanly, reducing splintering, especially on delicate materials.
Can a dull blade cause tear-out?
Absolutely. A dull blade is one of the primary causes of tear-out. Instead of cleanly slicing through the wood fibers, dull teeth will rip and pull them, leading to rough, splintered edges. Regularly inspecting your blade for sharpness and replacing or sharpening it as needed is crucial for preventing tear-out and ensuring safe operation.
How does a sacrificial fence prevent tear-out?
A sacrificial fence, often a piece of scrap wood clamped to your miter saw's fence, prevents tear-out by providing zero-clearance support directly at the point where the blade exits the workpiece. As the blade cuts into the sacrificial fence, it supports the wood fibers on the back side of your material, preventing them from blowing out or splintering as the blade passes through.
What cutting technique minimizes miter saw tear-out?
To minimize tear-out, always allow the miter saw blade to reach full rotational speed before starting the cut. Apply steady, consistent pressure as you bring the blade down through the material, avoiding rushing. Keep the blade fully depressed until it comes to a complete stop before raising it.
Why is workpiece support crucial for clean miter saw cuts?
Workpiece support is crucial because any unsupported section of wood can vibrate or lift during the cut, leading to splintering and tear-out. Securely clamping the material against the fence and using a sacrificial fence ensures the wood remains stable, allowing the blade to cut cleanly through the fibers.
How to Prevent Miter Saw Tear-Out for Clean Cuts
Preventing tear-out with your miter saw involves selecting the right blade, ensuring proper workpiece support, and optimizing your cutting technique to achieve smooth, splinter-free results.
Select a high-quality, sharp blade with 60 to 80 teeth, an Alternate Top Bevel (ATB) grind, and a negative hook angle. These features ensure the blade scores and severs wood fibers cleanly, significantly reducing the likelihood of tear-out. Regularly inspect your blade for sharpness and replace or sharpen it as soon as you notice any dullness.
Use a sacrificial fence or backer board by clamping a piece of scrap wood to your miter saw's fence. This provides zero-clearance support at the blade's exit point, preventing wood fibers from splintering. For smaller pieces, always use clamps to secure the material firmly against the saw table and fence, avoiding hand-holding.
Always allow the miter saw blade to reach its full rotational speed before beginning the cut. Apply steady, consistent pressure as you bring the blade down through the material, avoiding any forcing or rushing. After the cut, keep the blade fully depressed until it has come to a complete stop before raising it, as lifting a spinning blade can cause significant tear-out.
Understand how different wood types react to cutting. Softer, fibrous woods like pine are more prone to splintering and require extra care, while denser hardwoods generally cut cleaner. Pay attention to grain direction and, for delicate or knotty areas, consider taking slower cuts or reinforcing the cut line with painter's tape for additional protection.
Always wear personal protective equipment (PPE) including safety glasses and hearing protection. Ensure your miter saw is well-maintained, with a properly installed blade and functioning guards. Maintain a clear, well-lit workspace and adopt a stable stance, keeping hands away from the blade. These safety measures contribute to both your well-being and the precision of your cuts.
Get our weekly buyer guide
Practical specs, not advice. Unsubscribe anytime.
The advice on blade tooth count is solid, but I found that even with a high-tooth blade, I still get some minor chipping on really soft woods. It’s better than before, for sure, but not completely eliminated. Maybe I need to experiment more with the blade type itself, not just the tooth count. Still, good starting points for anyone dealing with tear-out.
I used to struggle with really messy cuts on my pine projects, especially on the back side. The tip about using a sacrificial fence was a game-changer for me. My last few cuts have been so much cleaner, and I’m not wasting nearly as much material trying to fix splintered edges. Definitely recommend trying that out if you’re having trouble.
This was exactly what I needed! I was getting so frustrated with the jagged edges on my plywood cuts. The explanation about the blade ripping fibers instead of slicing them made so much sense. I focused on keeping my blade sharp and supporting the workpiece better, and it’s made a huge difference in the finish of my cabinets.
Great advice here! I always just assumed my cheap blade was the problem, but the reminder about a slow, controlled cutting technique really made a difference. I upgraded to a 60-tooth blade recently, and combined with taking my time, the tear-out is almost non-existent now. My woodworking projects look so much more professional.