Changing a miter saw blade safely for DIY home projects involves five critical steps: unplugging the saw, wearing protective gear, removing the old blade by loosening the reverse-threaded arbor nut clockwise, installing the new blade with correct orientation (teeth pointing down), and securing the arbor nut counter-clockwise. This process ensures precision cuts and extends the tool’s lifespan, preventing potential safety hazards from dull or damaged blades.
What is a Miter Saw?
A miter saw is a specialized power tool designed to make accurate crosscuts and miters in a workpiece. It’s primarily used for cutting molding, trim, and other long pieces of wood at various angles, making it a favorite for carpentry, woodworking, and home renovation projects. The saw typically features a circular blade mounted on a pivoting arm that can be swung left or right to set the desired miter angle.
There are several common types of miter saws, each offering distinct capabilities. A standard miter saw (or chop saw) makes straight cuts at set angles. A compound miter saw adds the ability to tilt the blade, allowing for bevel cuts in addition to miter cuts. For larger materials, a sliding compound miter saw features rails that let the saw head slide forward and backward, significantly increasing its cross-cutting capacity. Lastly, a dual-bevel compound miter saw can tilt both left and right, eliminating the need to flip the workpiece for opposing bevel cuts. Understanding your saw’s type is key to maximizing its potential and performing maintenance safely.
Essential Safety Precautions Before Changing Your Miter Saw Blade
Before you even think about touching the blade, safety must be your absolute top priority. Miter saws are powerful tools, and improper handling during a blade change can lead to serious injury. Neglecting these precautions is a common oversight, but it’s one you absolutely cannot afford.
Firstly, and most critically, always unplug your miter saw from the power outlet. This isn’t just a suggestion; it’s a non-negotiable step to prevent accidental startup. Secondly, equip yourself with the right personal protective equipment (PPE). Thick work gloves will protect your hands from the sharp edges of the blade, and safety glasses or goggles are essential to shield your eyes from any dust or debris that might be dislodged during the process. Work on a clean, stable, and well-lit surface to ensure you have clear visibility and no obstructions. Lastly, it’s always a good practice to consult your saw’s user manual. Each miter saw model might have specific features or recommendations for blade changes, and familiarizing yourself with these details can prevent unexpected issues.
Tools and Materials Needed for a Quick Blade Swap
Having the right tools at hand will make the blade changing process smooth and frustration-free. Most miter saws come equipped with the necessary accessories, but it’s good to be prepared.
You’ll need a blade wrench or Allen key, which is typically included with your saw and designed to fit the arbor nut. As mentioned, protective gloves are a must for handling the sharp blade. Of course, you’ll need your new miter saw blade, ensuring it has the correct diameter and arbor size for your specific saw. A clean cloth is useful for wiping away any sawdust or grime around the blade area before installing the new one. Depending on your saw’s design, a screwdriver might also be necessary to remove the blade guard or other covers that obstruct access to the blade. Familiarizing yourself with these components beforehand can save time and prevent any fumbling during the changeover.
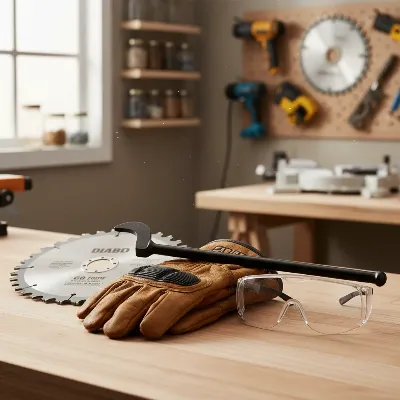 Essential tools and safety gear for safely changing a miter saw blade at home, including gloves, safety glasses, a wrench, and a new blade on a workbench.
Step-by-Step Guide: Removing the Old Miter Saw Blade
Now that you’re prepared with safety gear and tools, let’s carefully remove the old blade. This process requires attention to detail, especially when dealing with the arbor nut.
First, unplug the saw again, even if you’re certain it’s already disconnected. Safety redundancy is always a good idea. Next, engage the blade lock or spindle lock, a button or lever typically located near the blade that prevents it from spinning freely. This is crucial for safely loosening the arbor nut. Then, you’ll need to remove or lift the blade guard to gain full access to the blade. This might involve unscrewing a cover or simply rotating the guard upwards, depending on your saw model. With the blade guard out of the way, use your blade wrench or Allen key to loosen the arbor nut. This is an important detail: most miter saw arbor nuts are reverse-threaded, meaning you’ll turn them clockwise to loosen them. Attempting to turn counter-clockwise will only tighten it further. Once loosened, remove the arbor nut, washer, and then carefully slide the old blade off the arbor shaft. Be mindful of its sharp teeth and handle it with care.
Installing the New Miter Saw Blade Without a Hitch
With the old blade safely removed, installing the new one is straightforward, but precision is key for both performance and safety.
Before placing the new blade, take a moment to check its orientation. Miter saw blades have directional arrows printed on them, indicating the correct rotation. It’s vital to match this arrow with the rotation direction of your saw, which is often marked on the saw itself or in the manual. Typically, the teeth should be pointing downwards towards the table when the blade is in the cutting position. Carefully slide the new blade onto the arbor shaft, ensuring it sits flush against the inner flange. Next, replace the washer and hand-tighten the arbor nut. Hand-tightening first helps prevent cross-threading. Then, while holding the blade lock engaged, use your wrench to tighten the arbor nut. Remember, if it’s a reverse thread, you’ll be turning it counter-clockwise to tighten it firmly. Ensure it’s snug but avoid over-tightening, which can damage the threads or the blade itself. Finally, lower and secure the blade guard back into its original position, checking that it moves freely without binding. Once everything is reassembled, plug in your saw and perform a brief test spin without cutting any material to confirm the blade is secure and running true.
Common Mistakes to Avoid When Changing Your Miter Saw Blade
Even experienced DIYers can sometimes make errors during a blade change. Being aware of these common pitfalls can help you avoid them, ensuring a safer and more efficient process.
The most critical mistake, and one that bears repeating, is not unplugging the saw. This oversight can have dire consequences if the saw accidentally activates. Another frequent error is misaligning the blade direction. Installing the blade backward will result in inefficient cuts, excessive strain on the motor, and potential kickback, making it extremely dangerous. Over-tightening or under-tightening the arbor nut can also lead to problems; too tight can strip threads or warp the blade, while too loose can cause the blade to wobble or even detach during operation. Skipping the step of checking that the blade guard is properly reinstalled and functioning freely compromises a vital safety feature. Lastly, neglecting to wear gloves or eye protection leaves you vulnerable to cuts from sharp teeth and flying debris. Always treat your miter saw with the respect its power commands.
Expert Tips for Maintaining Your Blade’s Sharpness Longer
Replacing your miter saw blade doesn’t have to be a constant expense. With a few simple maintenance practices, you can significantly extend the life and sharpness of your blades.
One of the best ways to maintain sharpness is to clean your blade regularly. Wood sap, resin, and pitch can build up on the teeth, dulling the cutting edge and making cuts less efficient. A soft brush and a specialized blade cleaner can effectively remove this buildup, restoring performance. Secondly, avoid cutting materials like nails or screws embedded in wood. Striking metal will quickly dull and damage carbide teeth, requiring immediate replacement or sharpening. Proper storage is also essential; keep your blades dry to prevent rust and store them in their original packaging or a designated blade case to protect the teeth from accidental bumps or drops. Finally, always use blades that are appropriate for the material you are cutting. A blade designed for fine finish work on hardwoods will dull quickly if used for rough cutting of pressure-treated lumber. Matching the blade to the task maximizes its lifespan and ensures optimal cutting performance.
How to Choose the Right Replacement Blade on a Budget
Selecting the correct replacement blade is crucial for your miter saw’s performance and your project’s success. While it might seem daunting, you can find a high-quality blade that fits your needs without breaking the bank.
First, choose the correct blade diameter. Most miter saws use either 10-inch or 12-inch blades, so always check your saw’s manual or the old blade for the exact measurement. Equally important is to match the arbor size, which is the diameter of the hole in the center of the blade that fits onto your saw’s shaft. This must be an exact match, or you’ll need an adapter. Next, decide on the tooth count based on your typical projects. Blades with more teeth (e.g., 80-100 teeth) provide smoother, cleaner cuts, ideal for finish carpentry. Blades with fewer teeth (e.g., 24-40 teeth) cut faster but produce rougher edges, making them suitable for framing or rough construction. For general woodworking, a 60-tooth blade often provides a good balance. Lastly, look for durable, carbide-tipped blades. While they might have a slightly higher upfront cost than steel blades, carbide teeth retain their sharpness much longer and offer superior cutting performance, making them a more economical choice in the long run. Comparing offerings across various reputable retailers and reading user reviews can help you find excellent value.
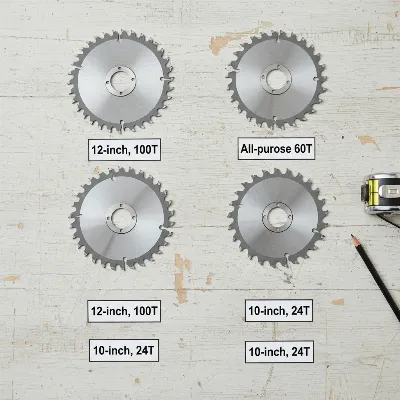 Various miter saw blades with different tooth counts and diameters displayed on a clean wooden surface, illustrating choices for DIY projects.
Conclusion
Mastering the art of safely changing your miter saw blade is an empowering skill for any home DIYer. By following these clear, step-by-step instructions and prioritizing safety at every turn, you not only ensure the longevity and peak performance of your tool but also safeguard your well-being in the workshop. From unplugging the saw and wearing proper protective gear to understanding blade orientation and tightening the arbor nut correctly, each step plays a vital role in a successful blade swap. Regular maintenance, such as cleaning your blades and selecting the right blade for the job, will further enhance your cutting precision and extend the lifespan of your valuable tools. Embrace these practices, and you’ll find your miter saw to be a more reliable and efficient partner for all your woodworking adventures. What project will you tackle next with your freshly sharpened miter saw?
Frequently Asked Questions
How often should I change my miter saw blade?
The frequency depends on your usage volume and the materials you cut. Generally, if you notice rougher cuts, splintering, or burning marks on wood, or if the saw struggles, it’s a good indication that it’s time to replace or sharpen your blade.
Can I use any size blade on my miter saw?
No, you must use a blade with the correct diameter and arbor hole size that matches your saw’s specifications. Using an incorrect size can lead to unsafe operation and damage to your tool or workpiece.
Is it necessary to tighten the arbor nut very hard?
The arbor nut should be tightened firmly but not excessively. Over-tightening can strip the threads or warp the blade, while under-tightening can cause the blade to wobble. Always refer to your saw’s manual for specific torque recommendations.
Should I always wear gloves when changing the blade?
Yes, absolutely. Always wear protective gloves when handling miter saw blades. The teeth are extremely sharp and can cause serious cuts, even when the saw is unplugged.
What blade tooth count is good for general carpentry?
For most general carpentry and DIY woodworking, a miter saw blade with around 60 teeth strikes an excellent balance between cutting speed and a smooth finish. For very fine crosscuts, you might opt for a higher tooth count (80-100T).
Frequently Asked Questions
How often should a miter saw blade be changed?
A miter saw blade should be changed when you observe rougher cuts, splintering, or burning marks on wood, or if the saw struggles during operation. The frequency depends on usage volume and the types of materials cut.
Can any size blade be used on a miter saw?
No, you must use a blade with the correct diameter and arbor hole size that precisely matches your specific miter saw's specifications. Using an incorrect size can lead to unsafe operation and potential damage to the tool or workpiece.
How firmly should the arbor nut be tightened when changing a blade?
The arbor nut should be tightened firmly but not excessively. Over-tightening can strip threads or warp the blade, while under-tightening can cause the blade to wobble. Always consult your saw's user manual for specific torque recommendations.
Is wearing gloves necessary when changing a miter saw blade?
Yes, absolutely. Always wear protective gloves when handling miter saw blades. The teeth are extremely sharp and can cause serious cuts, even when the saw is unplugged and stationary.
What tooth count is best for general carpentry miter saw blades?
For most general carpentry and DIY woodworking projects, a miter saw blade with approximately 60 teeth offers an excellent balance between cutting speed and a smooth finish. For very fine crosscuts, a higher tooth count (80-100T) may be preferred.
How to Safely Change a Miter Saw Blade
This guide outlines the essential steps to safely remove an old miter saw blade and install a new one, ensuring optimal performance and workshop safety for DIY projects.
Always unplug your miter saw from the power outlet to prevent accidental startup. Wear thick work gloves and safety glasses to protect your hands from sharp edges and your eyes from debris. Ensure your workspace is clean, stable, and well-lit.
Engage the blade lock to prevent the blade from spinning. Remove or lift the blade guard to access the arbor nut. Use a blade wrench or Allen key to loosen the arbor nut by turning it clockwise, as most miter saw arbor nuts are reverse-threaded. Carefully slide off the old blade, washer, and nut.
Check the new blade's directional arrow to ensure the teeth point downwards towards the table, matching the saw's rotation. Slide the new blade onto the arbor shaft, ensuring it sits flush. Replace the washer and hand-tighten the arbor nut.
While holding the blade lock, use your wrench to tighten the arbor nut by turning it counter-clockwise (for reverse-threaded nuts). Ensure it's snug but not over-tightened. Lower and secure the blade guard back into its original position, checking for free movement.
Once everything is reassembled, plug in your miter saw. Perform a brief test spin without cutting any material to confirm the blade is secure, running true, and that the blade guard operates correctly. This final check ensures safety and proper function.
Get our weekly buyer guide
Practical specs, not advice. Unsubscribe anytime.
The instructions were clear, especially about unplugging the saw before starting. However, I wish there was a bit more detail on how to hold the blade still while loosening the nut; my saw doesn’t have a spindle lock. It took me a while to get the old blade off, but the new one is cutting great for my carpentry projects.
This guide was really helpful for my first blade change. I appreciated the emphasis on wearing protective gear, which is something I sometimes forget in my rush. Installing the new blade with the correct orientation was a bit tricky at first, but I got it. My trim work looks much better now.
Fantastic breakdown of the miter saw blade change process! I’ve been putting off replacing my blade because I wasn’t sure about the steps, especially securing the arbor nut counter-clockwise. This made it feel much less intimidating. My cuts for molding are so much cleaner now, no more splintering.
I always dreaded changing my miter saw blade, but following these steps made it so much easier. The tip about the reverse-threaded arbor nut was a game-changer for me. My old blade was so dull, and now my cuts are super precise again. Definitely a must-read for anyone doing DIY projects.