A miter saw that won’t cut straight can be fixed by systematically checking and adjusting its components, including the blade, fence, miter angle, and bevel angle. Most accuracy issues stem from simple misalignments or a dull blade, which can be resolved with basic tools like a speed square and hex wrenches. Addressing these common culprits ensures precise cuts for woodworking and DIY projects.
1. Understanding Miter Saw Accuracy
A miter saw is an indispensable tool in any workshop, designed to make precise crosscuts, miter cuts, and bevel cuts. From framing to intricate trim work, its ability to cut consistent angles is paramount. When your miter saw isn’t cutting straight, it compromises the integrity and aesthetic of your work, making tasks like assembling picture frames or laying floorboards a challenge.
Several factors can cause your miter saw to lose its accuracy. The most frequent culprits include a worn or damaged blade, misaligned fences, incorrect miter or bevel angle settings, and even issues with the saw’s sliding mechanism or the flatness of its table. Sometimes, even a new saw might require calibration right out of the box due to shipping or manufacturing tolerances. Identifying the specific cause is the first step toward a perfect fix. For best miter saws roundups on this site.
2. Essential Tools for Calibration
Before you begin any adjustments, gather the necessary tools. Having these on hand will streamline the calibration process and ensure accuracy:
- Speed Square or Combination Square: Crucial for checking 90-degree angles.
- Straight Edge: For verifying the flatness of your saw table and fence.
- Digital Angle Finder (optional but recommended): Provides highly accurate angle measurements for bevel and miter adjustments.
- Hex Wrenches/Allen Keys and Screwdrivers: To loosen and tighten various adjustment screws on your saw.
- Scrap Wood: For making test cuts and verifying your adjustments.
- Safety Glasses and Hearing Protection: Always prioritize personal safety when working with power tools.
- Flashlight: Helpful for spotting subtle gaps during alignment checks.
3. Step-by-Step Guide to Fixing Your Miter Saw
Rectifying a miter saw that won’t cut straight is a methodical process. Always to prioritize safety by unplugging your saw before making any adjustments.
Safety First: Unplugging Your Saw
Before touching any part of your miter saw for adjustment or inspection, always ensure it is unplugged from the power source. This simple step prevents accidental startups and potential injury.
Inspecting and Replacing the Blade
The blade is the first point of contact with your material and often the easiest fix for crooked cuts.
- Check for Dullness or Damage: A dull blade can cause the saw to “wander” or burn the wood, leading to imprecise cuts. Inspect the carbide tips for any missing or damaged teeth.
- Look for Warping: A warped blade will visibly wobble when spun by hand. This can lead to non-square cuts and excessive vibration.
- Verify Proper Installation: Ensure the blade is installed correctly with the teeth facing the right direction and the arbor nut tightened securely. A loose blade will lead to inaccurate and unsafe cuts.
If your blade is dull, damaged, or warped, the only solution is to replace it with a new, high-quality blade appropriate for your saw and the materials you cut.
Squaring the Fence
|
Our Picks for the Best Miter Saw in 2026
As an Amazon Associate I earn from qualifying purchases.
|
||
| Num | Product | Action |
|---|---|---|
| 1 | HAUTMEC 14 Inch Clamping Miter Box with Adjustable Jaw & 4 Anti-Slip Clamps, Heavy Duty ABS Mitre Saw Box with 22.5°, 45°, 90° Cutting Angles for Woodworking, Trim, Frames, DIY Projects – HTHDM25036 |

|
| 2 | SKIL 3601-02 Flooring Saw with 36T Contractor Blade, Red and black |
|
| 3 | WEN MM0713 9.5-Amp 7.25-Inch Single Bevel Compact Sliding Compound Miter Saw with LED Cutline Guide, Black |
|
| 4 | Miter Saw Laser Guide - Miter and Portable Saw Laser Guide, Miter & Portable Saws |
|
| 5 | Olson Saw 35-241 Fine Kerf Saw 35-550 42 tpi with Aluminum Thin Slot Miter Box, Slot Size .014-Inch, Slot Angles 45, 60, 90, Cutting Depth 7/8-Inch, Pack of 1 |
|
| 6 | Makita LS0816F 8-1/2” Slide Compound Miter Saw |
|
| 7 | Metabo HPT 12-Inch Compound Miter Saw | Xact Cut LED Shadow Line System | Dual Bevel | C12FDHB |
|
| 8 | Stanley 1-20-600 Saw Storage Miter Box with Saw, Black |
|
| 9 | WEN Universal Collapsible Miter Saw Stand, 350-Pound Capacity (MSA200) |
|
| 10 | Seesii Mini Circular Saw with Laser Guide,4.8A 4000 RPM Compact Corded Circular Saw with Rip Guide,3 Blades (4-1/2") for Wood,Soft Metal,Tile,Plastic Cutting,Max Cut Depth 1-11/16"(90°),1-1/8" (45°) |
|
The fence provides crucial support for your workpiece and must be perfectly square to the blade.
- Check Fence Flatness: Use a straight edge to check if the two halves of your saw fence are perfectly co-planar and flat. Any bows or dips can throw off your cuts.
- Aligning the Fence to the Blade (90 Degrees):
- Lower the blade fully and unplug the saw.
- Place a speed square or combination square against the saw’s fence and then against the side of the blade (avoiding the teeth if possible, or use the body of the blade).
- Check for any gaps between the square and both the fence and the blade.
- If there’s a gap, locate the adjustment screws for your saw’s fence (often found at the back of the fence or underneath). Loosen them slightly.
- Adjust the fence until it is perfectly square to the blade, then retighten the screws. It’s often helpful to keep two screws slightly snug while making adjustments.
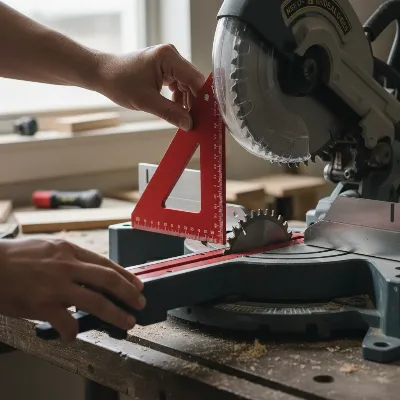 A person checking miter saw blade and fence alignment with a speed square.
Calibrating the Miter Angle (0 and 45 Degrees)
The miter angle determines the angle of the cut across the face of your workpiece. The 0-degree (straight cut) setting is fundamental.
- Checking 0-Degree Stop:
- Set the miter saw to its 0-degree detent.
- Use a square to check the alignment between the blade and the fence, as described above. They should form a perfect 90-degree angle.
- If misaligned, your saw likely has adjustment screws (often accessible through the miter angle plate or beneath the table) that allow you to fine-tune the 0-degree stop. Loosen these, adjust the table slightly until square, and then retighten.
- Adjusting the Miter Pointer: After adjusting the physical 0-degree stop, ensure your saw’s miter pointer accurately reads “0.” Loosen the small screw holding the pointer, align it, and then retighten.
- Checking 45-Degree Stops: Repeat a similar process for the 45-degree miter detents using a digital angle finder or by making test cuts on scrap wood (more on this below). Many saws have separate adjustment screws for the 45-degree stops.
Calibrating the Bevel Angle (90 and 45 Degrees)
The bevel angle controls the tilt of the blade, crucial for angled cuts through the thickness of the material.
- Checking 90-Degree Bevel (Blade Perpendicular to Table):
- Ensure the blade is set to a 0-degree miter.
- Tilt the blade to its 90-degree (vertical) position.
- Place a square flat on the saw table and against the side of the blade. There should be no gap between the square and the blade.
- If misaligned, locate the bevel adjustment screws (usually at the back of the saw’s head or near the pivot). Loosen them, adjust the blade until it’s perfectly perpendicular to the table, and then retighten.
- Checking 45-Degree Bevel: Set the saw to a 45-degree bevel and use a digital angle finder or make test cuts to verify accuracy. Adjust the 45-degree bevel stop if needed, following your saw’s manual.
Addressing Sliding Mechanism Play (for Sliding Miter Saws)
If you own a sliding miter saw and experience wobbly or inconsistent cuts, particularly when using the sliding function, play in the linear bearings might be the cause.
- How to Check for “Slop”: Unplug the saw, then gently push the saw head sideways while the arm is extended. Any noticeable movement or “slop” indicates wear in the bearings.
- Potential Fixes: Some sliding mechanisms have adjustable bearings that can be tightened. Consult your saw’s manual for specific instructions. If the bearings are worn beyond adjustment, they may need to be replaced, which can be a more involved repair.
Aligning the Laser Guide (if applicable)
If your miter saw has a laser guide, it can become misaligned over time, leading to cuts that don’t follow the laser line.
- How to Check Alignment: Turn on the laser and mark a line on a scrap piece of wood. Make a cut along that line. If the cut doesn’t perfectly follow the laser line, it needs adjustment.
- Adjustment Steps: Most laser assemblies have small adjustment screws. Refer to your saw’s manual for the exact location and procedure to align the laser with the actual blade kerf.
Performing Test Cuts for Verification
After making any adjustments, test cuts are essential to confirm your saw’s accuracy.
- The “Flip Test” for 90-Degree Cuts: Make a crosscut on a piece of scrap wood. Then, flip one of the cut pieces end-for-end and place the cut edges together. If the cut is perfectly square, the two pieces will meet without any gap. Any gap indicates further adjustment is needed.
- Testing Miter and Bevel Cuts: For miter and bevel cuts, make two pieces that should theoretically join perfectly (e.g., two 45-degree miter cuts for a 90-degree corner). If there are gaps in the joint, fine-tune your adjustments. Always make full, steady cuts; shallow cuts can deflect the blade and give misleading results.
 A person performing a test cut on scrap wood with a miter saw to check for straightness.
4. Maintenance Tips for Sustained Accuracy
Regular maintenance can significantly extend the life and accuracy of your miter saw.
- Keep it Clean: Dust and debris can build up in crucial mechanisms, affecting smooth operation and accuracy. Regularly clean the table, fence, pivot points, and blade area.
- Blade Care: Always use sharp, clean blades. Clean resin and pitch buildup from your blade to maintain cutting efficiency.
- Proper Storage: Store your miter saw in a clean, dry environment, protected from impacts that could throw it out of alignment.
- Periodic Checks: Make checking and calibrating your miter saw a routine part of your workshop maintenance, especially before critical projects.
5. When to Consider Professional Repair or Replacement
While many issues can be fixed with DIY adjustments, some problems may be beyond a simple tune-up.
- Major Component Damage: If you discover a bent arbor shaft, a damaged motor, or severely worn non-adjustable bearings, professional repair or replacement might be necessary.
- Persistent Inaccuracy: If, after repeated calibration attempts, your saw still refuses to cut straight, it might be time to seek expert help or consider investing in a new tool.
- Cost-Benefit Analysis: Weigh the cost of professional repair against the price of a new miter saw. For older, less expensive models, replacement often makes more economic sense.
Consistent, precise cuts are the hallmark of quality craftsmanship. By taking the time to understand, diagnose, and fix common accuracy issues, you can keep your miter saw performing at its best. Regular maintenance and a systematic approach to calibration will ensure your projects always start with a straight and true cut.
Get our weekly buyer guide
Practical specs, not advice. Unsubscribe anytime.
The advice on checking the miter angle was good, and it did help a bit. However, I still feel like my older saw has some play in it that even these adjustments can’t fully fix. It’s better, but not perfect for really intricate trim work. Maybe it’s time for an upgrade after all.
This was super helpful! I thought I needed a new blade, but it turned out to be a simple fence alignment issue. The tips on using a speed square to check everything were spot on. Saved me a bunch of money and now my cuts for shelving are much cleaner.
My miter saw was driving me crazy with inconsistent crosscuts for my flooring project. I followed the steps for checking the blade and realized mine was duller than I thought. Swapped it out and did the other checks, and now it’s cutting like new. So glad I found these tips before giving up!
I was having so much trouble with my miter saw making angled cuts that were just slightly off. Following the guide here, especially the part about checking the bevel angle, made all the difference. My picture frames are finally coming out perfectly square. It’s amazing what a small adjustment can do!