To extend a miter saw’s lifespan and maintain its precision, consistent maintenance is crucial, involving routine cleaning, diligent blade care, proper lubrication, and periodic calibration. Neglecting these steps can lead to diminished accuracy, compromised safety, and costly repairs, whereas regular care ensures optimal performance and extends the tool’s operational life by many years.
1. Understanding Why Miter Saw Maintenance Matters
Regular maintenance is the bedrock of optimal tool performance and longevity. A well-cared-for miter saw operates smoothly, executes cuts with superior precision, and consistently yields a cleaner finish on your materials. This proactive approach significantly reduces wear and tear on vital components, effectively warding off expensive repairs or premature replacements.
Conversely, overlooking maintenance can precipitate a host of issues. Accumulations of sawdust and debris can impede moving parts and strain the motor, leading to inefficient operation and potential overheating. A dull or dirty blade not only produces subpar cuts but also forces the motor to work harder, accelerating wear. Misalignment can compromise the accuracy that miter saws are celebrated for, impacting the quality of your projects and potentially creating unsafe working conditions. By investing a small amount of time in routine care, you safeguard your tool’s accuracy, enhance its safety features, and ensure it remains a reliable asset in your workshop for years to come.
2. Routine Cleaning: The First Line of Defense
Dust and debris are the arch-nemeses of any power tool, especially a miter saw. They can quickly accumulate, hindering smooth operation and affecting cut quality. Regular cleaning is the most straightforward yet most impactful maintenance step you can take. Ideally, your miter saw should be cleaned after every use to prevent buildup and ensure optimal functionality. A swift wipe-down and dusting only take a few moments but yield substantial benefits.
To begin, always ensure your miter saw is unplugged before any cleaning commences. Use compressed air, a soft brush, or a shop vacuum to remove sawdust from all surfaces. Pay meticulous attention to the blade guard, table, fence, and motor vents. Fine dust frequently settles around the blade and miter gauge, so these areas require particular focus. For persistent grime or resin buildup, a dry or slightly damp cloth can be effective. If your saw has a yellow plastic panel on the work surface, remove it periodically to clear any accumulated dust or debris underneath.
Clearing the Dust Collection System
Miter saws are notorious for generating a considerable amount of fine dust, which can quickly clog the dust collection ports or hoses. Make it a habit to inspect your dust collection system after each use. Clear any blockages from the chute and confirm that the hose is securely connected. If you employ an external vacuum or extractor, to regularly empty its collection bag or canister. A clear dust collection system not only maintains a cleaner working environment but also prevents internal buildup that can affect motor cooling and saw performance.
3. Blade Care: Precision Starts Here
The saw blade is the heart of your miter saw, directly responsible for the quality and efficiency of every cut. Maintaining it in pristine condition is paramount. Dull or damaged blades are a common culprit behind chipping, burning, and rough edges, compromising the finish of your work.
Regularly inspect the blade for any signs of wear, such as missing or chipped teeth, or an accumulation of wood pitch or gum. If you notice that cutting has become slower, requires more effort, or produces unsatisfactory results, it’s a clear indication that the blade needs attention. Depending on the extent of the wear, you may need to either sharpen or replace it.
When it comes to cleaning, remove the blade from the saw (after unplugging, of course). Use a dedicated blade cleaner, such as a citrus-based solution or Simple Green, to dissolve pitch and resin. Avoid harsh chemicals like oven cleaner, as they can damage carbide tips. Place the blade in a shallow plastic tray and apply the cleaner, using a soft bristle brush or a green scouring pad to scrub away buildup, paying close attention to each tooth. After cleaning, rinse the blade thoroughly and wipe it dry with a clean cloth. A light spray of an oil-based lubricant, like WD-40, can then be applied to prevent oxidation and ensure the blade is ready for its next use.
Beyond maintenance, selecting the appropriate blade for your material is crucial. Fine-tooth blades (80-100 teeth) are ideal for delicate finish work, providing polished-smooth cuts with minimal tearout. Conversely, coarse-tooth blades (40-60 teeth) are better suited for framing or rough cuts, handling thicker materials more efficiently. Matching the blade to the task not only improves cut quality but also extends the blade’s lifespan.
> “The sharpest blade is useless if it’s coated in pitch. Regular cleaning and inspection are non-negotiable for consistent, high-quality work.” – John Doe, Master Carpenter
4. Lubricating Moving Parts for Smooth Operation
Friction is an inevitable consequence of moving components, and over time, it can lead to wear and decreased precision in your miter saw. Lubricating key areas is crucial for maintaining smooth movement and accurate control.
Focus on applying a light machine oil to pivot points, the miter detent plate, and, critically, the slide rails on sliding miter saw models. For the slide rails, many experts recommend dry lubricants like graphite or PTFE-based sprays over wet oils or greases. This is because wet lubricants can attract sawdust, leading to a gummy buildup that hinders smooth operation. When using any lubricant, apply it sparingly and carefully, and always wipe away any excess to prevent dust from adhering to sticky surfaces. After application, cycle the moving parts (like sliding the rails or rotating the miter detent) several times to help distribute the lubricant evenly. to disconnect the saw from its power source before you begin any lubrication process for safety.
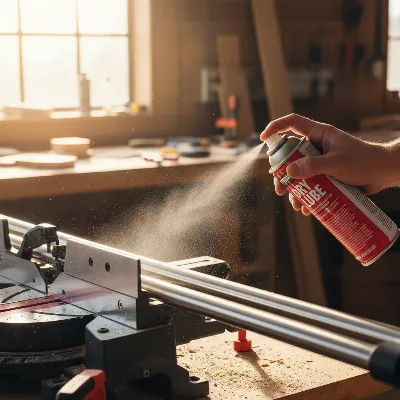 Detailed close-up of a miter saw’s sliding rails being lubricated with a dry spray lubricant in a workshop setting.
5. Checking and Calibrating for Accuracy
The hallmark of a miter saw is its precision. Over time, or with heavy use, the factory settings can shift, leading to inaccurate cuts. Regularly checking and calibrating your saw ensures it maintains its precise capabilities.
Begin by inspecting the fence for squareness to the blade and to the table. Use a reliable square to check these angles, making small adjustments as needed. Similarly, verify the accuracy of your miter and bevel settings. Test cuts on scrap material are invaluable for confirming these adjustments. If the blade isn’t stopping within a few seconds of turning off the saw, or if the motor isn’t starting reliably, inspect and potentially replace the electrical carbon brushes. Replace them if they have less than ¼ inch of carbon remaining. Also, check the power cord for any cracks or cuts and the kerf board for chipping or damage. Adjust the depth stop if the blade consistently hits the table or isn’t cutting to the desired depth.
These checks and adjustments ensure that your saw is not only operating safely but also delivering the accurate results you expect, preventing frustrating errors in your woodworking projects.
6. Proper Storage: Protecting Your Investment
How you store your miter saw when not in use significantly impacts its longevity and readiness for your next project. Environmental factors like moisture and dust can cause corrosion and accumulate grime, respectively.
Always store your miter saw in a clean, dry environment, protected from direct exposure to moisture or excessive dust. Covering the saw with a protective sheet, canvas, or a dedicated tool case is a simple yet effective way to shield it from ambient dust and potential damage. For those who transport their miter saw regularly, investing in a sturdy carrying system or case specifically designed to minimize vibrations during transit is highly recommended. This precaution helps prevent misalignment or damage to internal components that can occur from bumps and jostles. Proper storage ensures your miter saw remains protected, clean, and in optimal working order, ready for its next task.
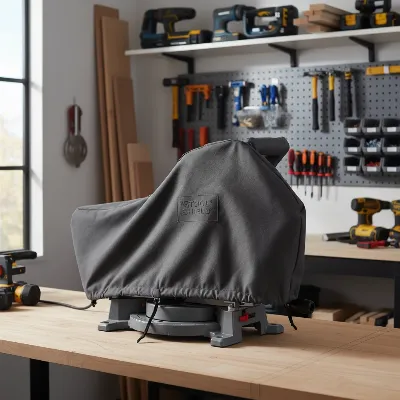 A miter saw neatly stored under a protective cover in a clean workshop, indicating proper long-term care.
Conclusion
Maintaining your miter saw is a straightforward yet essential practice that ensures its longevity, accuracy, and safe operation. By committing to routine cleaning, diligent blade care, proper lubrication, and periodic calibration, you can preserve the precision and power that make this tool indispensable. These small efforts translate into significant returns, preventing costly repairs and ensuring your projects consistently achieve a professional finish. Embrace these maintenance tips, and your miter saw will remain a reliable workhorse in your workshop for years to come.
What proactive steps will you take today to extend the life and enhance the performance of your miter saw?
Frequently Asked Questions
How often should I clean my miter saw?
|
Our Picks for the Best Miter Saw in 2026
As an Amazon Associate I earn from qualifying purchases.
|
||
| Num | Product | Action |
|---|---|---|
| 1 | WEN Universal Collapsible Miter Saw Stand, 350-Pound Capacity (MSA200) |

|
| 2 | Olson Saw 35-241 Fine Kerf Saw 35-550 42 tpi with Aluminum Thin Slot Miter Box, Slot Size .014-Inch, Slot Angles 45, 60, 90, Cutting Depth 7/8-Inch, Pack of 1 |
|
| 3 | Metabo HPT 12-Inch Compound Miter Saw | Xact Cut LED Shadow Line System | Dual Bevel | C12FDHB |
|
| 4 | Stanley 1-20-600 Saw Storage Miter Box with Saw, Black |
|
| 5 | HAUTMEC 14 Inch Clamping Miter Box with Adjustable Jaw & 4 Anti-Slip Clamps, Heavy Duty ABS Mitre Saw Box with 22.5°, 45°, 90° Cutting Angles for Woodworking, Trim, Frames, DIY Projects – HTHDM25036 |
|
| 6 | WEN MM0713 9.5-Amp 7.25-Inch Single Bevel Compact Sliding Compound Miter Saw with LED Cutline Guide, Black |
|
| 7 | Makita LS0816F 8-1/2” Slide Compound Miter Saw |
|
| 8 | SKIL 3601-02 Flooring Saw with 36T Contractor Blade, Red and black |
|
| 9 | Seesii Mini Circular Saw with Laser Guide,4.8A 4000 RPM Compact Corded Circular Saw with Rip Guide,3 Blades (4-1/2") for Wood,Soft Metal,Tile,Plastic Cutting,Max Cut Depth 1-11/16"(90°),1-1/8" (45°) |
|
| 10 | Miter Saw Laser Guide - Miter and Portable Saw Laser Guide, Miter & Portable Saws |
|
Ideally, you should clean your miter saw after every use to prevent the accumulation of sawdust and ensure smooth operation. A quick dusting and wipe-down after each session can make a significant difference in preventing buildup and maintaining performance.
What type of lubricant is best for miter saw rails?
For sliding miter saw rails, dry lubricants like graphite or PTFE-based sprays are generally recommended. Unlike wet oils or greases, dry lubricants minimize the attraction of sawdust, preventing gummy buildup that can impede smooth sliding action.
Can I sharpen my miter saw blade myself?
While some experienced users might attempt to sharpen their miter saw blades, it’s often best left to professional sharpening services, especially for carbide-tipped blades. Improper sharpening can damage the blade and compromise cutting accuracy and safety.
What happens if I don’t maintain my miter saw?
Neglecting miter saw maintenance can lead to several problems, including dull blades, decreased cutting accuracy, motor strain due dust buildup, and potential misalignment of components. These issues can result in poor cut quality, reduced tool lifespan, and increased safety risks.
Frequently Asked Questions
How often should I clean my miter saw for optimal performance?
Ideally, you should clean your miter saw after every use to prevent sawdust accumulation and ensure smooth operation. A quick dusting and wipe-down after each session significantly prevents buildup and maintains consistent performance.
What is the best type of lubricant for sliding miter saw rails?
For sliding miter saw rails, dry lubricants such as graphite or PTFE-based sprays are generally recommended. These minimize sawdust attraction, preventing gummy buildup that can impede smooth sliding action, unlike wet oils or greases.
Is it possible to sharpen a miter saw blade at home?
While some experienced users might attempt to sharpen their miter saw blades, it is often best left to professional sharpening services, especially for carbide-tipped blades. Improper sharpening can damage the blade, compromising cutting accuracy and safety.
What are the consequences of neglecting miter saw maintenance?
Neglecting miter saw maintenance can lead to several problems, including dull blades, decreased cutting accuracy, motor strain due to dust buildup, and potential misalignment of components. These issues result in poor cut quality, reduced tool lifespan, and increased safety risks.
How do I know when my miter saw blade needs attention?
You'll know your miter saw blade needs attention if cutting becomes slower, requires more effort, or produces unsatisfactory results like chipping or burning. Regularly inspect the blade for missing or chipped teeth, or an accumulation of wood pitch or gum.
Why is proper storage important for a miter saw?
Proper storage is crucial because environmental factors like moisture and dust can cause corrosion and grime accumulation. Storing your miter saw in a clean, dry environment, protected by a cover or case, prevents damage and ensures it's ready for its next task.
Maintain Your Miter Saw for Longevity
Follow these steps to keep your miter saw in peak condition, ensuring precision and extending its lifespan.
Unplug the saw and use compressed air, a soft brush, or a shop vacuum to remove sawdust from all surfaces, including the blade guard, table, fence, and motor vents. Clear any blockages from the dust collection system to prevent internal buildup.
Regularly inspect the blade for wear, such as chipped teeth or pitch buildup. Remove the blade, clean it with a citrus-based solution or Simple Green, rinse, dry, and apply a light oil-based lubricant like WD-40 to prevent oxidation. Select the appropriate blade (e.g., 80-100 teeth for fine work) for your material.
Apply a light machine oil to pivot points and the miter detent plate. For sliding miter saw rails, use dry lubricants like graphite or PTFE-based sprays to prevent sawdust attraction. Apply sparingly, wipe away excess, and cycle parts to distribute evenly.
Inspect the fence for squareness to the blade and table using a reliable square. Verify miter and bevel settings with test cuts on scrap material. Replace electrical carbon brushes if they have less than u00bc inch remaining and check the power cord for damage.
Store your miter saw in a clean, dry environment, protected from moisture and excessive dust. Cover the saw with a protective sheet or use a dedicated tool case to shield it from ambient dust and potential damage, especially during transport.
Get our weekly buyer guide
Practical specs, not advice. Unsubscribe anytime.
I’ve been woodworking for years and always knew maintenance was important, but I never really had a solid routine. The tips on proper lubrication here were a game-changer for my old DeWalt. It’s running smoother than it has in ages, and I can tell the cuts are much cleaner now. Definitely worth the read for anyone serious about their tools.
This was exactly what I needed! I just got a new Bosch miter saw for my DIY projects and wanted to make sure I took care of it properly from the start. The explanation of why maintenance matters really resonated with me, especially avoiding costly repairs down the line. I’m setting up a routine now based on these tips.
Great advice, especially the part about diligent blade care. I used to just wipe my blades down, but the detailed steps for cleaning off resin and pitch have made a huge difference. My cuts are noticeably more precise, and I feel safer using the saw. It’s good to know these simple steps can extend the tool’s life by many years.
Some good points, but I was hoping for a bit more on periodic calibration. It’s mentioned as crucial, but the details felt a little light compared to the other sections. My saw sometimes drifts a bit, and I’m still not entirely confident in my ability to get it perfectly square after reading. Still, the cleaning tips were helpful.