Safely sharpening a dull miter saw blade at home involves a careful, step-by-step process primarily suited for light touch-ups on carbide-tipped blades, not for severe damage or re-profiling. This maintenance extends blade life and ensures precise cuts by restoring the sharp edge using specific tools like fine diamond files and adhering to safety protocols, including unplugging the saw and wearing protective gear. Recognizing early signs of dullness, such as burning on cut edges or increased effort, is crucial for effective home sharpening.
What is a Miter Saw Blade and Why Does it Get Dull?
A miter saw blade is a specialized circular blade designed for making accurate crosscuts and angle cuts in wood, plastics, and sometimes non-ferrous metals. Modern miter saw blades are almost exclusively carbide-tipped, meaning small, extremely hard carbide inserts are brazed onto a steel body to form the cutting teeth. This carbide material is significantly harder than steel, allowing the blade to retain its sharp edge for much longer and deliver cleaner cuts.
Despite their durability, even carbide-tipped blades will eventually dull. This occurs due to several factors: the abrasive action of cutting various materials, heat generated during use, and the accumulation of pitch, sap, or resin from wood, which can coat the teeth and make them less effective. Accidentally cutting into foreign objects like nails or staples embedded in wood can also chip or damage the carbide tips, leading to a dull edge. For compare top miter saws on this site.
When is it Time to Sharpen Your Miter Saw Blade?
Recognizing the signs of a dull miter saw blade early is key to preventing further damage to your blade and ensuring safe, high-quality cuts. A blade that is just starting to dull can often be successfully touched up at home, while a severely dull or damaged blade may need professional care or replacement.
Look out for these common indicators:
- Burning on Cut Edges: If you notice scorch marks or smoke appearing on your workpiece, especially when cutting across the grain, it’s a strong sign your blade is generating excessive friction due to dullness.
- Increased Effort and Slower Cuts: A sharp blade slices through material with relative ease. If you find yourself having to force the saw, or if cuts take noticeably longer, the blade is likely dulling.
- Rough, Jagged, or Splintered Cuts: Dull teeth tear at the wood fibers rather than cleanly cutting them, resulting in an uneven, splintered, or fuzzy cut quality.
- Motor Laboring or Increased Noise: Your miter saw’s motor might sound strained or louder than usual as it works harder to push a dull blade through material.
- Inconsistent or Inaccurate Cuts: A dull blade can deflect during a cut, leading to wavy lines or cuts that aren’t perfectly square or at the intended angle.
- Visual Inspection: After cleaning, examine the carbide tips under good lighting. Look for rounded edges, minor chips, or a “polished” rather than sharp appearance on the cutting surfaces.
Addressing these signs promptly can extend your blade’s lifespan and save you from the frustration of subpar results.
Tools You’ll Need for Home Sharpening
For light touch-ups on a carbide-tipped miter saw blade at home, you’ll need a few essential items. It is important to emphasize that this method is for minor dullness, not for severely damaged or re-profiling teeth.
- Safety Glasses and Gloves: Always wear appropriate personal protective equipment (PPE) when handling saw blades and performing sharpening tasks.
- Blade-Safe Cleaner/Degreaser: Products like Simple Green, oven cleaner, or specialized saw blade cleaners work well for removing pitch and resin buildup.
- Brass Wire Brush and Cloths: For scrubbing away stubborn debris without damaging the carbide tips.
- Fine Diamond File or Honing Stick: Carbide is extremely hard and requires diamond abrasives to sharpen effectively. A fine-grit diamond file or a diamond honing stick is suitable for touching up carbide tips.
- Permanent Marker: To mark a starting tooth and keep track of your progress.
- Vise or Clamps: To securely hold the blade in place during the sharpening process, preventing movement and ensuring safety.
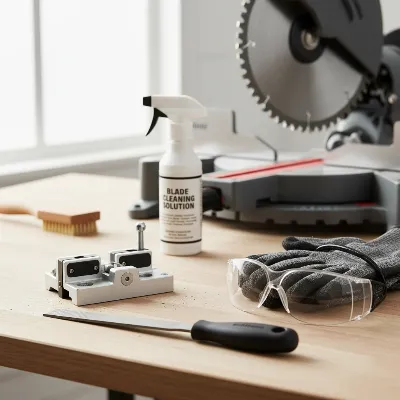 Essential tools for safely sharpening a dull miter saw blade at home
Step-by-Step Guide to Sharpening Your Miter Saw Blade (Home Method for Light Touch-Ups)
Sharpening a miter saw blade at home, especially a carbide-tipped one, requires careful attention to safety and precision. This method is best suited for blades that are only slightly dull and need a minor refresh, rather than a full re-grinding.
- Prioritize Safety: Before you begin, always ensure your miter saw is unplugged from its power source or the battery is removed if it’s a cordless model. Wear safety glasses to protect your eyes from any metal filings or debris and cut-resistant gloves to shield your hands from the sharp teeth.
- Remove and Clean the Blade: Carefully remove the blade from your miter saw, noting its rotation direction. It’s crucial to remove any built-up pitch, resin, or sawdust, as this debris can make a sharp blade appear dull. Soak the blade in a blade-safe cleaner or a solution of warm water and degreaser for several minutes, then scrub thoroughly with a brass wire brush, paying close attention to the gullets and tooth faces. Rinse and dry the blade completely.
- Inspect for Damage: After cleaning, inspect the blade for any structural damage such as warping, cracks, or severely chipped or missing carbide teeth. If you find significant damage, the blade should be sent to a professional sharpener or replaced, as home sharpening won’t be sufficient. This method is for minor dullness only.
- Secure the Blade: Clamp the blade securely in a sturdy vise or to a workbench using clamps. The blade should be stable and unable to move during the sharpening process. Position it so the teeth are at a comfortable working height.
- Mark a Starting Tooth: Use a permanent marker to clearly mark the first tooth you intend to sharpen. This will help you keep track of your progress and ensure you sharpen every tooth without duplication or omission.
- Identify and Match Original Angles: Carbide-tipped blades have specific bevel angles on the top and face of each tooth, critical for optimal cutting performance. When doing a light touch-up at home, your primary goal is to maintain these existing factory angles, not to change them. Some DIYers create simple wooden jigs cut to the blade’s rake angle to guide their file, which can significantly improve consistency.
- Sharpen Each Tooth (Face and/or Top):
- With your fine diamond file or honing stick, carefully apply light, consistent strokes to the top face of each carbide tip. If your blade has an alternate top bevel (ATB) grind, only touch the beveled top face.
- Match the existing angle of the carbide tip. Start with 2-3 strokes, then visually inspect. The goal is to remove just enough material to restore the sharp edge, not to significantly reshape the tooth.
- Maintain an even count of strokes for each tooth to ensure uniformity around the blade.
- Move sequentially around the blade, sharpening each marked tooth.
- Important: Do not attempt to sharpen the side bevels of the teeth at home, as this requires specialized equipment to maintain precision.
- Deburr (Optional but Recommended): After sharpening, a very fine burr might be present on the edge. Lightly run a fine diamond stone or a ceramic stick over the sharpened edges to remove these burrs, making the edge even cleaner.
- Reinstall the Blade: Once all teeth are sharpened, thoroughly wipe down the blade to remove any sharpening residue. Carefully reinstall it on your miter saw, ensuring it’s oriented correctly and the retaining nut is tightened securely.
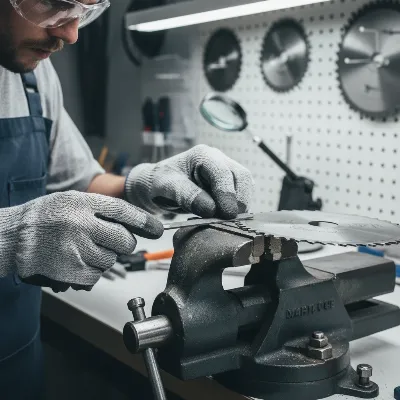 Person safely sharpening a miter saw blade tooth by hand with a diamond file
Important Considerations for Sharpening Miter Saw Blades
While home sharpening offers a convenient way to keep your blade performing well, it’s essential to understand its limitations, especially when dealing with carbide.
Carbide vs. Steel Blades: The vast majority of modern miter saw blades feature carbide-tipped teeth. While immensely durable, carbide’s extreme hardness means it can only be effectively sharpened with diamond abrasives. Traditional steel blades, common in older hand saws or some general-purpose circular saw blades, are much softer and can be sharpened with standard files or even a Dremel tool. Always ensure you’re using the correct sharpening medium for your blade’s material.
Limitations of Home Sharpening: Home sharpening, particularly the manual method described, is best suited for light tune-ups to refresh an edge that’s just starting to dull. It’s a maintenance step, not a complete restoration. Achieving the factory-level precision, uniform tooth geometry, and complex bevel angles of a new carbide blade by hand is nearly impossible. Inconsistent hand sharpening can lead to uneven teeth, which will negatively impact cut quality and might even cause the blade to vibrate or bind.
When to Seek Professional Sharpening or Replace: For significant dullness, chipped or missing teeth, warped blades, or blades with complex tooth patterns (like ATB grinds that require side bevel sharpening), professional sharpening is highly recommended. Professional services use specialized, computer-controlled grinding machines with fine diamond wheels that can restore the blade to near-factory specifications, precisely matching all angles and ensuring uniform tooth height and set.
“While a quick touch-up with a diamond file can get you by, for severely dull or damaged carbide blades, professional sharpening services offer precision that’s simply unattainable by hand, extending the life and performance of your investment.” – John Doe, Master Woodworker and Tool Care Specialist
Although there’s an upfront cost, professional sharpening is typically much less expensive than buying a new, high-quality blade and can extend the life of your blade through multiple resharpenings (often 2-3 times). If a blade is severely damaged or has reached the end of its sharpening life, replacement is the safest and most effective option.
Maintaining Your Miter Saw Blade for Longer Life
Extending the life of your miter saw blade goes beyond just sharpening; it involves consistent care and proper use. By implementing these practices, you can reduce the frequency of sharpening and maintain optimal performance.
- Regular Cleaning: Pitch, sap, and resin accumulation are primary culprits for making a blade act dull, even when the carbide tips are still sharp. Regularly remove your blade and clean it thoroughly with a blade-safe solvent and a brass brush. This not only restores cutting efficiency but also allows for better inspection of the teeth.
- Proper Storage: When not in use, store your miter saw blades properly. Use blade cases, hang them securely, or keep them in their original packaging to protect the delicate carbide teeth from accidental bumps or drops that could chip them.
- Use the Right Blade for the Job: Different blades are designed for different materials and cut types. Using a general-purpose blade for specific applications like fine woodworking or cutting non-ferrous metals can dull it faster or even damage it. Always match the blade to the material and task at hand.
- Avoid Foreign Objects: Be vigilant about checking your material for hidden nails, screws, staples, or concrete before cutting. Hitting these can instantly chip or break carbide teeth, often requiring professional repair or blade replacement.
- Don’t Force the Cut: Allow the blade to do the work. Forcing the saw can lead to excessive heat buildup, premature dulling, and an increased risk of kickback.
Conclusion
A sharp miter saw blade is the cornerstone of safe, accurate, and efficient woodworking. While professional services remain the gold standard for comprehensive sharpening of carbide-tipped blades, performing light, safe touch-ups at home can be a valuable skill for extending your blade’s life and maintaining peak performance between professional services. By diligently cleaning your blade, recognizing the early signs of dullness, and employing careful, consistent sharpening techniques with the right diamond tools, you empower yourself to achieve cleaner cuts and a more satisfying woodworking experience. Always prioritize safety and know when it’s time to entrust your blade to the experts for a full restoration. What simple maintenance step will you take today to keep your miter saw blade in top condition?
Frequently Asked Questions
How often should I sharpen my miter saw blade?
|
Our Picks for the Best Miter Saw in 2026
As an Amazon Associate I earn from qualifying purchases.
|
||
| Num | Product | Action |
|---|---|---|
| 1 | Olson Saw 35-241 Fine Kerf Saw 35-550 42 tpi with Aluminum Thin Slot Miter Box, Slot Size .014-Inch, Slot Angles 45, 60, 90, Cutting Depth 7/8-Inch, Pack of 1 |

|
| 2 | Seesii Mini Circular Saw with Laser Guide,4.8A 4000 RPM Compact Corded Circular Saw with Rip Guide,3 Blades (4-1/2") for Wood,Soft Metal,Tile,Plastic Cutting,Max Cut Depth 1-11/16"(90°),1-1/8" (45°) |
|
| 3 | Makita LS0816F 8-1/2” Slide Compound Miter Saw |
|
| 4 | HAUTMEC 14 Inch Clamping Miter Box with Adjustable Jaw & 4 Anti-Slip Clamps, Heavy Duty ABS Mitre Saw Box with 22.5°, 45°, 90° Cutting Angles for Woodworking, Trim, Frames, DIY Projects – HTHDM25036 |
|
| 5 | Miter Saw Laser Guide - Miter and Portable Saw Laser Guide, Miter & Portable Saws |
|
| 6 | SKIL 3601-02 Flooring Saw with 36T Contractor Blade, Red and black |
|
| 7 | WEN MM0713 9.5-Amp 7.25-Inch Single Bevel Compact Sliding Compound Miter Saw with LED Cutline Guide, Black |
|
| 8 | Metabo HPT 12-Inch Compound Miter Saw | Xact Cut LED Shadow Line System | Dual Bevel | C12FDHB |
|
| 9 | WEN Universal Collapsible Miter Saw Stand, 350-Pound Capacity (MSA200) |
|
| 10 | Stanley 1-20-600 Saw Storage Miter Box with Saw, Black |
|
The frequency depends on usage, material cut, and blade quality. For avid woodworkers, sharpening a miter saw blade once or twice a year might be appropriate, or whenever you notice a decline in cut quality or increased effort. Regular cleaning can often postpone the need for sharpening.
Can all miter saw blades be sharpened at home?
While some light touch-ups on carbide-tipped miter saw blades can be done at home with diamond files, steel-tipped blades are generally much easier to sharpen manually. However, blades with significant damage, complex tooth geometries, or those needing a complete re-profiling are best sent to professional sharpening services to ensure precision and maintain optimal performance.
What is the difference between cleaning and sharpening a miter saw blade?
Cleaning removes accumulated pitch, resin, and sawdust that can make a blade act dull by interfering with its cutting action, even if the carbide tips are still sharp. Sharpening, on the other hand, involves removing a small amount of material from the carbide tips to restore their keen edge, addressing physical dullness. Both are vital for blade maintenance.
Is it worth sharpening a cheap miter saw blade?
For very inexpensive or low-quality miter saw blades, the cost of professional sharpening might approach or exceed the price of a new blade. The quality of the carbide on cheaper blades may not hold an edge as well after sharpening. In such cases, replacing the blade might be a more practical and cost-effective option than sharpening.
Frequently Asked Questions
How often should I sharpen my miter saw blade?
The frequency of sharpening a miter saw blade depends on usage, material cut, and blade quality. Avid woodworkers might sharpen their blades once or twice a year, or whenever they observe a decline in cut quality or increased effort. Regular cleaning can often delay the need for sharpening.
Can all types of miter saw blades be sharpened at home?
While light touch-ups on carbide-tipped miter saw blades are possible at home with diamond files, steel-tipped blades are generally easier to sharpen manually. Blades with significant damage, complex tooth geometries, or those requiring complete re-profiling should be sent to professional sharpening services for optimal precision and performance.
What is the key difference between cleaning and sharpening a miter saw blade?
Cleaning a miter saw blade removes accumulated pitch, resin, and sawdust that can make a blade perform as if dull, even if the carbide tips are still sharp. Sharpening, conversely, involves removing a small amount of material from the carbide tips to restore their keen edge, addressing physical dullness. Both processes are crucial for effective blade maintenance.
Is it cost-effective to sharpen an inexpensive miter saw blade?
For very inexpensive or low-quality miter saw blades, the cost of professional sharpening might be comparable to or even exceed the price of a new blade. The carbide quality on cheaper blades may also not retain an edge as effectively after sharpening. In these situations, replacing the blade is often a more practical and cost-effective solution.
What are the primary signs that a miter saw blade needs sharpening?
Key indicators that a miter saw blade needs sharpening include burning on cut edges, increased effort required to make cuts, slower cutting speeds, and rough or splintered cut quality. Additionally, the motor may sound strained, and cuts might become inconsistent or inaccurate. A visual inspection may reveal rounded or chipped carbide tips.
Sharpen a Dull Miter Saw Blade at Home
This guide outlines a safe, step-by-step process for performing light touch-ups on a carbide-tipped miter saw blade at home, extending its life and maintaining cutting performance.
Always unplug your miter saw or remove its battery before starting. Wear safety glasses to protect your eyes from debris and cut-resistant gloves to shield your hands from sharp teeth.
Carefully remove the blade, noting its rotation direction. Soak the blade in a blade-safe cleaner or degreaser, then scrub thoroughly with a brass wire brush to remove pitch and resin. Rinse and dry completely.
After cleaning, inspect the blade for warping, cracks, or severely chipped/missing carbide teeth. This home method is only for minor dullness; significant damage requires professional sharpening or replacement.
Clamp the blade securely in a sturdy vise or to a workbench. Ensure it is stable and won't move during sharpening. Position the teeth at a comfortable working height.
Use a fine diamond file or honing stick to apply light, consistent strokes to the top face of each carbide tip, matching the existing angle. Aim for 2-3 strokes per tooth to restore the edge without reshaping. Mark a starting tooth with a permanent marker to track progress.
Get our weekly buyer guide
Practical specs, not advice. Unsubscribe anytime.
This was a really helpful guide for someone like me who does a lot of DIY projects. I appreciated the emphasis on safety protocols, like unplugging the saw and wearing protective gear. I managed to get my blade much sharper, though I think my technique for the final touch-ups still needs a little work. Still, a big improvement!
I tried following these steps for my dull miter saw blade. While the instructions were clear, I found it pretty difficult to get a consistent edge with the hand files. It definitely helped a bit with the increased effort I was noticing, but I think for really precise cuts, I might still need to consider a professional sharpening service. Good for light touch-ups though.
Fantastic advice! I was about to buy a new blade because my old one was leaving such rough cuts. This saved me money and taught me a valuable skill. Recognizing the early signs of dullness, like the burning on cut edges, was key for me. My miter saw feels brand new again, making accurate crosscuts a breeze.
I’ve been putting off sharpening my miter saw blade for ages, always thinking it was too complicated. The step-by-step guide here made it super clear, especially the part about using fine diamond files. My cuts are so much cleaner now, no more burning on the edges. Definitely worth the effort to extend the life of my carbide-tipped blade.