For both seasoned craftsmen and enthusiastic DIYers, precision is paramount in woodworking. A miter saw stands as an indispensable tool in any workshop, allowing for incredibly accurate angled cuts essential for everything from intricate trim work to robust framing projects. While the fundamental design of a miter saw offers inherent accuracy, the integration of a laser guide elevates this precision, providing a clear visual representation of your cut line before the blade even touches the material. If you’re looking to enhance your cutting accuracy and efficiency, exploring miter saws equipped with advanced laser guidance systems is a smart move for 2026, ensuring your projects consistently achieve professional-grade results.
What is a Miter Saw?
A miter saw is a specialized power tool designed to make precise crosscuts and miter cuts (angled cuts) in a workpiece. It features a circular saw blade mounted on a hinged arm that pivots to the left or right for angled cuts, and can also tilt for bevel cuts. This unique design makes it superior to traditional hand saws or circular saws for achieving clean, consistent angles, which are crucial for tasks like installing crown molding, laying flooring, or building furniture.
There are several types of miter saws, each offering different capabilities: For more miter saws guides on this site.
- Standard Miter Saw: The most basic type, capable of making simple crosscuts and miter cuts by pivoting the blade horizontally. These are generally the most affordable and suitable for straightforward projects.
- Compound Miter Saw: Adds the ability to tilt the blade vertically (bevel) in one direction, allowing for compound cuts (a miter and a bevel cut simultaneously). This is ideal for crown molding, which requires both angles.
- Dual-Bevel Compound Miter Saw: An upgrade from the compound miter saw, this type can tilt the blade both left and right, eliminating the need to flip the workpiece for opposing bevel cuts. This saves time and increases convenience, especially with long materials.
- Sliding Compound Miter Saw: Features horizontal rails that allow the blade to slide forward and backward, significantly increasing the crosscutting capacity. This is excellent for wider boards, such as shelving or decking, that a fixed blade wouldn’t be able to cut in a single pass.
- Cordless Miter Saw: Offers the freedom of portability without being tethered to an outlet. These saws are powered by rechargeable batteries and are increasingly capable, making them popular for job sites or areas without easy power access.
How to Choose the Right Miter Saw with a Laser Guide
Selecting the perfect miter saw involves balancing your specific project needs with the tool’s features, especially when prioritizing laser guidance. Beyond the type of saw, several key factors come into play that will influence your cutting precision, capacity, and overall user experience. Understanding these elements will empower you to make an informed decision and invest in a tool that truly meets your woodworking demands.
Determining Your Usage Needs
Before diving into specifications, consider the scale and frequency of your projects. Are you a weekend DIYer tackling small home improvements, or a professional contractor demanding daily use for large-scale construction? Your intended use dictates the necessary power, durability, and features. For occasional, light-duty tasks, a compact 10-inch saw might suffice, while heavy-duty framing or extensive trim work calls for a robust 12-inch sliding dual-bevel model with ample power and capacity.
Key Factors to Consider When Buying a Miter Saw
-
Blade Size and Cutting Capacity: Miter saws typically come with 8, 10, or 12-inch blades. A larger blade diameter generally translates to a greater cutting capacity, allowing you to cut wider and thicker materials in a single pass. A 10-inch saw is versatile for many home projects, while a 12-inch model excels with larger lumber and demanding professional applications. Always check the saw’s specifications for its maximum crosscut and vertical cutting capacities at various angles.
-
Power and Speed: The motor’s amperage (typically 10 to 15 amps) indicates its power. A 15-amp motor is standard for 10-inch and 12-inch saws, providing sufficient power for cutting hardwoods and dense materials without bogging down. Higher RPMs (revolutions per minute) contribute to cleaner cuts, especially on delicate materials. Some advanced saws feature variable speed controls, allowing you to match the blade speed to the material for optimal results and reduced tear-out.
-
Miter and Bevel Angles: All miter saws offer adjustable miter angles (horizontal pivots), typically ranging from 45 degrees left to 45 degrees right, with positive stops at common angles like 0, 15, 22.5, 30, and 45 degrees for quick setup. Compound saws add bevel capability (vertical tilt), usually up to 45 degrees in one or both directions. Look for easy-to-read scales, smooth adjustments, and reliable locking mechanisms to ensure consistent accuracy.
-
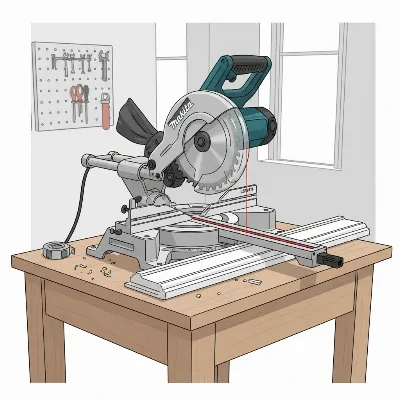
Laser System and LED Shadow Line: This is where precision gets a significant boost. A laser guide projects a thin, bright line onto your workpiece, indicating exactly where the blade will cut. This eliminates guesswork, improves accuracy, and speeds up the cutting process. While highly beneficial, it’s worth noting that some professionals favor LED shadow line indicators, which cast a shadow of the blade onto the workpiece, naturally accounting for the blade’s kerf (thickness) and requiring less calibration. However, for those specifically seeking a visible beam, a well-calibrated laser guide is an invaluable feature. Ensure the laser is bright, adjustable, and maintains its alignment over time and with blade changes.
-
Safety Features: Prioritize safety. Essential features include:
- Blade Guard: A transparent, retractable guard that covers the blade when not in use.
- Electric Brake: Stops the blade quickly after the trigger is released, reducing accident risk.
- Workpiece Clamp: Secures your material to prevent movement during cutting.
- Dust Collection: A dust bag or port for connecting to a shop vacuum helps keep the workspace clean and improves visibility, contributing to safety.
-
Brand and Price: Reputable brands like Makita, Metabo HPT, DeWalt, and Bosch are known for quality and durability. While higher-priced models often offer more features, better build quality, and superior accuracy, there are also excellent mid-range options that provide great value. Consider your budget, but view a miter saw as an investment that will pay off in project quality and efficiency.
-
Portability and Storage: If you need to move your saw frequently, consider its weight and footprint. Sliding miter saws, especially those with axial glide systems, can save significant space by allowing the saw to be placed against a wall, making them ideal for smaller workshops.
Comparing Popular Miter Saw Types
When choosing a miter saw, understanding the distinctions between the primary types is essential to match the tool to your cutting demands. Each offers unique advantages in terms of capacity, versatility, and cost.
| Feature / Type | Standard Miter Saw | Compound Miter Saw | Sliding Compound Miter Saw | Dual-Bevel Sliding Compound Miter Saw |
|---|---|---|---|---|
| Miter Cuts | Yes (horizontal angles) | Yes (horizontal angles) | Yes (horizontal angles) | Yes (horizontal angles) |
| Bevel Cuts | No | Yes (tilts one direction, e.g., left only) | Yes (tilts one direction, e.g., left only) | Yes (tilts both left and right) |
| Crosscut Capacity | Limited (fixed blade) | Limited (fixed blade) | Extended (blade slides on rails for wider cuts) | Extended (blade slides on rails for wider cuts) |
| Complexity | Basic | Moderate | Advanced | Most Advanced |
| Best For | Simple trim, small crosscuts | Crown molding, picture frames, basic angled cuts | Wider boards, decking, general carpentry | Complex trim, large-scale projects, high versatility |
| Cost | Lowest | Mid-range | Higher | Highest |
| Space Required | Low | Low | Moderate to High (due to rails, unless axial glide) | Moderate to High (due to rails, unless axial glide) |
> “The right miter saw isn’t just about raw power; it’s about matching its capabilities—especially its cutting capacity and precision guidance—to the intricate demands of your craft. For consistent, repeatable accuracy, the clarity of your cut line, whether laser or shadow, is non-negotiable.” – Alex Rennie, Former Residential and Commercial Carpenter
Top Miter Saws with Laser Guides to Buy in 2026
Focusing on models that explicitly offer laser guides for enhanced precision, here are some of the top miter saws that stand out in the market for 2026. These selections prioritize accurate laser systems alongside overall performance and build quality.
1. Makita LS1219L 12″ Dual-Bevel Sliding Compound Miter Saw
The Makita LS1219L is a powerhouse designed for professionals seeking uncompromising precision and versatility. It sets a high standard for laser-guided cutting systems.
-
Pros:
- Highly Accurate Laser System: Features an adjustable laser that provides precise cut line indication, designed to remain calibrated even after blade changes. This is critical for consistently accurate results.
- Innovative 2-Steel Rail Sliding System: Provides exceptional stability and a smooth cutting action, enhancing precision.
- Dual-Bevel Capability: Allows for both left and right bevel cuts without needing to flip the material, saving time and effort on complex projects.
- Direct-Drive Motor: Ensures smooth operation with a soft start, making it ideal for delicate materials and prolonged use.
- Space-Saving Design: Allows for flush wall mounting while maintaining full cutting capacity, a huge advantage in smaller workshops.
- Large Cutting Capacity: Handles substantial lumber, making it suitable for a wide range of tasks from framing to detailed trim.
-
Cons:
- Premium Price: As a top-tier professional tool, it comes with a higher price tag.
- Weight: Its robust construction makes it quite heavy, impacting portability for some users.
-
Price: High-end professional tool (typically $700-$1000)
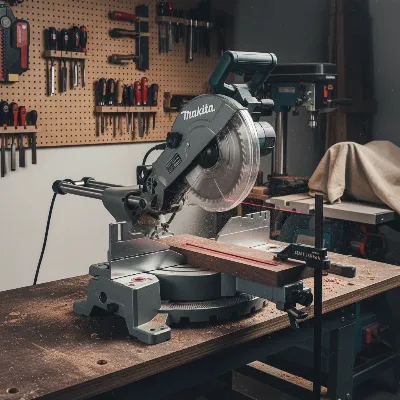 Makita LS1219L 12-inch dual-bevel sliding compound miter saw with active laser guide on a wooden workpiece.
2. Metabo HPT C12RSH3 12″ Dual-Bevel Sliding Compound Miter Saw with Laser
The Metabo HPT C12RSH3 (formerly Hitachi Power Tools) offers an excellent balance of professional-grade features, including a reliable laser guide, at a more accessible price point.
-
Pros:
- Adjustable Laser System: Delivers strong laser precision, aiding in accurate alignment for various cuts.
- Competitive Price Point: Provides significant value, making professional accuracy more affordable.
- Powerful Motor: Handles demanding applications effectively, maintaining precision under load.
- Compact Slide System: Utilizes a fixed rail system that allows the saw head to slide without requiring rear clearance, making it suitable for smaller spaces.
- Dual-Bevel Design: Offers the convenience of beveling in both directions.
-
Cons:
- Dust Collection: While adequate, it may not be as robust as some higher-end models.
- Blade Quality: The included blade might be suitable for general use, but upgrading could enhance performance for fine work.
-
Price: Mid-to-high range (typically $400-$600)
 Metabo HPT C12RSH3 12-inch dual-bevel sliding compound miter saw with laser guide cutting timber.
3. Makita LS1019L 10″ Dual-Bevel Sliding Compound Miter Saw
For those with smaller workshop spaces or projects that don’t require the immense capacity of a 12-inch blade, the Makita LS1019L is a superb choice that doesn’t compromise on laser-guided accuracy.
-
Pros:
- Professional Laser Accuracy: Provides a precise laser cut line, ensuring accurate alignment for detailed work.
- Compact Size: Its 10-inch blade and innovative sliding rail system (similar to the LS1219L) make it ideal for smaller workspaces while still offering excellent crosscut capacity.
- Dual-Bevel Action: Offers the convenience of dual-bevel cuts.
- Powerful 15 Amp Motor: Drives the blade at 3,200 RPM, providing ample power for various wood materials.
- Balanced Design: Offers smooth operation and excellent build quality, suitable for detailed woodworking.
-
Cons:
- Reduced Cutting Capacity: Being a 10-inch saw, its capacity is less than 12-inch models, limiting the size of material it can handle.
- Price: Still a premium price for a 10-inch model, reflecting Makita’s quality.
-
Price: Mid-to-high range (typically $500-$750)
 Makita LS1019L 10-inch dual-bevel sliding compound miter saw with laser guide in a compact workshop.
How to Use a Miter Saw Safely and Effectively
Operating a miter saw requires careful attention to safety and proper technique to ensure precise cuts and prevent accidents. Even with advanced features like laser guides, understanding fundamental best practices is crucial for every user. Adhering to these guidelines will not only enhance your results but, more importantly, keep you safe while working with this powerful tool.
Essential Safety Measures
Safety should always be your top priority when using a miter saw.
- Read the Manual: Always begin by thoroughly reading your saw’s instruction manual. Familiarize yourself with all features, controls, and safety warnings specific to your model.
- Wear Personal Protective Equipment (PPE):
- Eye Protection: Safety glasses or goggles are mandatory to protect against flying debris.
- Hearing Protection: Earplugs or earmuffs are essential to prevent hearing damage from loud noise.
- Dust Mask: A dust mask or respirator protects your lungs from fine wood dust.
- Gloves (Optional): Avoid loose gloves that could get caught in the blade.
- Secure Your Workpiece: Always use clamps to firmly hold your material against the fence and the saw table. Never hold the workpiece by hand, especially for small pieces.
- Clear the Work Area: Ensure your workspace is clean, well-lit, and free of clutter. Remove any scraps, tools, or anything that could interfere with the saw’s operation or your footing.
- Check the Blade: Before each use, inspect the blade for sharpness, damage, or missing teeth. A dull or damaged blade can cause kickback and inferior cuts.
- Maintain a Safe Distance: Keep your hands at least 6 inches away from the blade. Use push sticks or jigs for very small pieces.
- Allow the Blade to Reach Full Speed: Before beginning a cut, allow the blade to reach its maximum RPM. This ensures a cleaner cut and reduces strain on the motor.
- Complete the Cut: Push the blade slowly and steadily through the material. Once the cut is complete, allow the blade to stop spinning completely before raising it.
- Unplug When Changing Blades or Adjusting: Always disconnect the saw from its power source before performing any maintenance, blade changes, or significant adjustments.
Basic Cutting Techniques
Mastering a few fundamental cutting techniques will allow you to maximize your miter saw’s potential.
-
Crosscuts: For cutting a board to length, perpendicular to its grain.
- Mark your desired length on the workpiece.
- Position the board firmly against the fence and table.
- Align the blade (or laser guide) to your mark. Remember to account for the blade’s kerf; cut on the waste side of the line.
- Lower the blade smoothly and steadily through the material.
- Raise the blade only after it has stopped spinning.
-
Miter Cuts: For making angled cuts across the face of the board.
- Adjust the miter saw’s turntable to the desired angle (e.g., 45 degrees for a corner joint).
- Secure the workpiece.
- Align the blade/laser with your mark, again considering the kerf.
- Perform the cut as with a crosscut.
-
Bevel Cuts: For making angled cuts along the edge of the board.
- Unlock the blade assembly and tilt it to the desired bevel angle (e.g., 45 degrees).
- Secure the workpiece firmly.
- Align the blade/laser and make the cut.
-
Compound Cuts: Combining miter and bevel angles, often used for crown molding.
- Set both the miter and bevel angles according to your project’s specifications (a chart is often helpful here).
- Secure the material, paying extra attention to holding it firmly due to the double angle.
- Proceed with the cut carefully and smoothly.
Tips and Tricks for More Effective Use
- Test Cuts: Always make a few test cuts on scrap material, especially when setting up for complex angles or using a new blade. This helps verify accuracy and familiarizes you with the saw’s behavior.
- Support Long Material: Use outfeed supports or roller stands for long workpieces to prevent them from tipping, which can cause inaccurate cuts or kickback.
- Clear the Kerf: After each cut, remove the small offcut pieces from the blade area before making the next cut to prevent them from becoming projectiles or obstructing the saw.
- Calibrate Your Laser: If your saw has a laser guide, periodically check its alignment against a test cut. Refer to your manual for adjustment procedures if it drifts out of true.
- Smooth Motion: Consistency in lowering and raising the blade leads to cleaner, more precise cuts. Avoid jerky movements.
Maintenance and Cleaning Your Miter Saw
Proper maintenance and regular cleaning are vital for extending the lifespan of your miter saw, maintaining its precision, and ensuring safe operation. Neglecting these steps can lead to decreased performance, inaccurate cuts, and potential safety hazards. A well-cared-for miter saw will serve you reliably for years.
Regular Maintenance Tips
-
Blade Inspection and Replacement:
- Check for Wear: Regularly inspect the blade for dullness, bent teeth, cracks, or missing carbide tips. A dull blade can strain the motor, burn wood, and increase the risk of kickback.
- Replace as Needed: Replace worn or damaged blades promptly. Use high-quality blades appropriate for the material you are cutting (e.g., higher tooth count for fine finishing, lower tooth count for rough framing).
- Clean Blades: Remove pitch and resin buildup from the blade using a dedicated blade cleaner. This improves cutting efficiency and longevity.
-
Motor and Carbon Brushes (if applicable):
- Listen for Changes: Pay attention to any unusual noises or reduced power from the motor.
- Inspect Carbon Brushes: For brushed motors, check the carbon brushes periodically (typically every few hundred hours of use). Replace them if they are worn down to their limit, as specified in your manual. (Brushless motors do not have carbon brushes).
-
Lubrication:
- Sliding Rails: For sliding miter saws, keep the sliding rails clean and lightly lubricated with a dry lubricant or a non-residue silicone spray as recommended by the manufacturer. Avoid greasy lubricants that attract dust.
- Pivot Points: Lightly lubricate any pivot points or moving parts as specified in the manual to ensure smooth adjustments.
-
Fasteners and Bolts: Periodically check all nuts, bolts, and fasteners to ensure they are tight. Vibration during operation can cause them to loosen over time, affecting accuracy and safety.
-
Laser Guide Alignment: If your saw has a laser, check its calibration periodically. Follow the manufacturer’s instructions for realigning the laser if it becomes inaccurate.
How to Clean Your Miter Saw Properly
Keeping your miter saw clean is just as important as mechanical maintenance.
- Disconnect Power: Always unplug your miter saw before beginning any cleaning or maintenance. This is a critical safety step.
- Remove Dust and Debris:
- Use a shop vacuum to remove sawdust and larger debris from the entire saw, paying close attention to the motor vents, blade guard, fence, and miter detents.
- Use a soft brush or compressed air to dislodge stubborn dust from crevices and moving parts.
- Wipe down all surfaces with a clean, dry cloth. For sticky resin buildup, a damp cloth with a mild solvent (check manufacturer guidelines) can be used, ensuring it’s dried thoroughly afterward.
- Clean the Blade Guard: A clear blade guard is essential for visibility. Clean it regularly with a non-abrasive cleaner to remove sawdust and smudges that can obscure your view of the workpiece and cut line.
- Clean the Laser Lens: If your saw has a laser guide, gently wipe the laser lens with a soft, clean cloth to ensure maximum beam visibility.
- Clear the Table and Fence: Keep the miter saw table and fence clear of debris and buildup. Any irregularities can affect the accuracy of your cuts.
- Store Properly: When not in use, store your miter saw in a clean, dry environment, preferably covered to protect it from dust and moisture.
Where to Buy Reputable Miter Saws
Investing in a miter saw, especially one with a precision laser guide, is a significant decision for any woodworker. To ensure you receive an authentic product, reliable customer service, and valid warranty coverage, it’s crucial to purchase from reputable sources. Here are some trusted avenues for acquiring your next miter saw.
- Authorized Retailers and Home Improvement Stores: Large home improvement chains such as Home Depot, Lowe’s, and Ace Hardware are authorized dealers for major power tool brands. They offer a wide selection, often have display models for you to examine, and provide local support for returns or warranty claims. Their staff can also offer advice, though it’s always good to do your own research.
- Online Power Tool Specialists: Websites like Amazon, Acme Tools, Toolbarn, and Ohio Power Tool specialize in power tools and often have a more extensive selection than brick-and-mortar stores. They frequently offer competitive pricing, detailed product specifications, and customer reviews. When buying online, always verify the seller is an authorized dealer to ensure your warranty is valid.
- Manufacturer Websites: Many top brands, including Makita and Metabo HPT, allow direct purchases from their official websites. This guarantees you are getting a genuine product and often provides access to exclusive bundles or extended warranties. It’s also an excellent resource for product information, support, and finding authorized local dealers.
- Specialty Woodworking Stores: Local woodworking supply stores may offer a more curated selection of high-end tools and provide expert advice tailored to specific woodworking niches. While prices might be slightly higher, the personalized service and in-depth product knowledge can be invaluable.
When making your purchase, always:
- Check the Warranty: Understand the manufacturer’s warranty terms and conditions.
- Read Reviews: Look for recent reviews from other users, paying attention to comments on laser accuracy, ease of use, and durability.
- Compare Prices: Shop around to find the best deal, but be wary of prices that seem too good to be true, as they could indicate counterfeit products or lack of warranty.
Conclusion
Choosing the best miter saw with a laser guide for 2026 comes down to balancing your project requirements, desired cutting capacity, and precision needs with the tool’s features and overall value. Models like the Makita LS1219L, Metabo HPT C12RSH3, and Makita LS1019L stand out for their reliable laser systems, robust performance, and thoughtful designs, catering to a range of users from dedicated hobbyists to seasoned professionals. By considering factors like blade size, power, bevel capabilities, and essential safety features, you can confidently select a miter saw that not only enhances your accuracy but also streamlines your workflow. With the right miter saw, achieving flawless cuts becomes not just a possibility, but a consistent reality.
What critical project will you tackle first with your new, laser-guided precision tool?
Frequently Asked Questions
What is the advantage of a miter saw with a laser guide?
A miter saw with a laser guide projects a precise beam of light onto your workpiece, visually indicating the exact path the blade will take. This eliminates guesswork, significantly improves cutting accuracy, and helps you make quick, confident adjustments, leading to less material waste and more professional results.
Are laser guides on miter saws always accurate?
While laser guides are designed for accuracy, their precision can vary between models and may require occasional calibration. It’s crucial to perform test cuts and ensure the laser is correctly aligned with the blade’s kerf. Some professionals prefer shadow line indicators for their inherent accuracy, but well-maintained laser guides offer excellent visual assistance.
How do I maintain the laser on my miter saw?
To maintain your miter saw’s laser guide, keep the lens clean and free of sawdust buildup. Periodically check its alignment by making test cuts on scrap material. If the laser drifts, consult your saw’s manual for instructions on how to recalibrate it, which typically involves minor adjustments with a screwdriver.
Can I add a laser guide to a miter saw that doesn’t have one?
Yes, aftermarket laser guides are available that can be installed on many miter saws. These typically attach to the blade arbor or mount externally. While they can add a visual guide, their integration and precision might not match a factory-installed system, and careful calibration will be necessary.
What’s the difference between a laser guide and a shadow line indicator?
A laser guide projects a thin line of light directly onto the workpiece. A shadow line indicator, often powered by an LED, casts a shadow of the blade itself onto the material. Shadow lines inherently account for the blade’s thickness (kerf) and don’t require calibration after blade changes, which some users find more reliable than traditional lasers.
Which blade size is best for a miter saw with a laser guide?
The best blade size depends on your cutting capacity needs. 10-inch blades are versatile for many DIY and general woodworking tasks, while 12-inch blades offer greater crosscut and depth capacity for larger lumber and professional projects. The laser guide functionality is available on saws with various blade sizes.
Frequently Asked Questions
What is the primary advantage of a miter saw with a laser guide?
A miter saw with a laser guide projects a precise beam of light onto your workpiece, visually indicating the exact path the blade will take. This significantly improves cutting accuracy by eliminating guesswork, leading to less material waste and more professional results.
How accurate are laser guides on miter saws, and do they need calibration?
While laser guides are designed for accuracy, their precision can vary between models and may require occasional calibration. It is crucial to perform test cuts and ensure the laser is correctly aligned with the blade's kerf. Well-maintained laser guides offer excellent visual assistance for precise cuts.
What is the proper way to maintain the laser on my miter saw?
To maintain your miter saw's laser guide, keep the lens clean and free of sawdust buildup. Periodically check its alignment by making test cuts on scrap material. If the laser drifts, consult your saw's manual for instructions on how to recalibrate it, which typically involves minor adjustments.
Can a laser guide be added to a miter saw that does not include one?
Yes, aftermarket laser guides are available that can be installed on many miter saws. These typically attach to the blade arbor or mount externally. While they provide a visual guide, their integration and precision might not match a factory-installed system, and careful calibration will be necessary.
What is the difference between a laser guide and a shadow line indicator on a miter saw?
A laser guide projects a thin line of light directly onto the workpiece, while a shadow line indicator, often LED-powered, casts a shadow of the blade itself onto the material. Shadow lines inherently account for the blade's thickness (kerf) and do not require calibration after blade changes, which some users find more reliable.
Which blade size is recommended for a miter saw with a laser guide?
The best blade size depends on your specific cutting capacity needs. 10-inch blades are versatile for many DIY and general woodworking tasks, while 12-inch blades offer greater crosscut and depth capacity for larger lumber and professional projects. Laser guide functionality is available across various blade sizes.
How to Choose the Right Miter Saw with a Laser Guide
Selecting the perfect miter saw involves balancing your specific project needs with the tool's features, especially when prioritizing laser guidance. Understanding key factors will empower you to make an informed decision.
Consider the scale and frequency of your projects. For occasional, light-duty tasks, a compact 10-inch saw might suffice, while heavy-duty framing or extensive trim work calls for a robust 12-inch sliding dual-bevel model with ample power.
Miter saws typically come with 8, 10, or 12-inch blades. A larger blade diameter generally translates to a greater cutting capacity, allowing you to cut wider and thicker materials in a single pass. A 10-inch saw is versatile, while a 12-inch model excels with larger lumber.
Look for a motor with 10 to 15 amps for sufficient power, and consider higher RPMs for cleaner cuts. Ensure the saw offers adjustable miter angles (typically 45 degrees left to 45 degrees right) and, for compound saws, bevel capability up to 45 degrees in one or both directions.
A laser guide projects a thin, bright line onto your workpiece, improving accuracy. Essential safety features include a transparent, retractable blade guard, an electric brake, a workpiece clamp, and effective dust collection to keep your workspace clean and safe.
Reputable brands like Makita and Metabo HPT are known for quality. While higher-priced models offer more features, excellent mid-range options exist. If portability is crucial, consider the saw's weight and footprint; sliding miter saws with axial glide systems can save space.
Get our weekly buyer guide
Practical specs, not advice. Unsubscribe anytime.
I bought a miter saw with a laser guide specifically for intricate trim work, and while it’s mostly good, I’ve noticed the laser on mine isn’t always perfectly aligned right out of the box. I had to do a bit of calibration to get it spot on, which was a bit annoying. Once adjusted, it works well, but that initial setup was a hassle.
As an enthusiastic DIYer, I can’t believe I waited so long to get a miter saw with a laser. The precision for angled cuts is just incredible. It’s made a huge difference in the quality of my furniture builds and shelving units. Definitely a smart move for anyone looking to enhance their cutting accuracy.
I picked up one of the models mentioned for around the $300-$400 price range, and it’s been fantastic for my framing projects. The accuracy is definitely there, and the laser guide makes setting up cuts so much faster. My only minor gripe is that the laser can be a little hard to see in really bright sunlight, but indoors it’s perfect.
I finally upgraded to a miter saw with a laser guide after years of eyeballing cuts, and it’s a game changer. The visual representation of the cut line before the blade even touches the material has saved me so much time and wasted wood. My trim work has never looked this professional. Highly recommend for anyone serious about their DIY projects.