Safely storing extra miter saw blades is crucial for maintaining their sharpness, preventing damage, and ensuring workshop safety. Improper storage can dull edges, chip carbide teeth, and lead to rust, compromising blade integrity and increasing safety risks during operation. Implementing DIY storage solutions like pull-out tray cabinets or vertical wall-mounted racks protects your investment and keeps your workspace organized.
Understanding Your Miter Saw Blades and Why Storage is Crucial
Miter saw blades are precision tools with sharp, often carbide-tipped teeth, designed for specific cutting tasks. These teeth are highly susceptible to damage from impacts or improper handling. A chipped tooth or warped blade can result in inaccurate cuts, increased friction, and dangerous kickbacks. Additionally, blades are prone to rust and corrosion in humid environments, which weakens their structure and can render them unusable. Proper storage safeguards these tools, extends their longevity, and maintains the quality and safety of woodworking projects.
Essential Considerations for Safe Miter Saw Blade Storage
Effective miter saw blade storage requires attention to several key factors. First, the storage environment must be dry, cool, and well-ventilated, away from direct sunlight and excessive humidity, as moisture causes rust. Second, physical protection is critical; blades should be individually protected to prevent contact that can chip teeth or bend the blade body. Third, accessibility and organization are important for an efficient workflow, allowing quick identification and retrieval. Finally, secure storage minimizes the risk of accidental cuts, enhancing overall workshop safety. For shop curated miter saws on this site.
Comparing Miter Saw Blade Storage Solutions
When organizing miter saw blades, both commercial and DIY solutions offer distinct advantages. Commercial options, such as specialized blade carriers or wall-mounted racks, provide convenience and robust protection with dedicated enclosures. For example, some systems use durable plastic holders that encase blades and slide into steel docks. However, these might not perfectly fit unique workshop spaces or specific blade collections.
DIY storage, conversely, offers ultimate flexibility and customization. Solutions like pull-out tray cabinets, vertical wall-mounted racks, or custom boxes with dividers can be tailored to exact needs using materials like plywood or hardboard. While DIY requires an initial time investment for planning and construction, it often results in a more cost-effective and perfectly integrated storage system that maximizes available space.
| Feature | Commercial Storage Systems | DIY Storage Solutions |
|---|---|---|
| Cost | Generally higher upfront investment | Potentially lower, especially with scrap materials |
| Customization | Limited to existing product designs | Highly customizable to exact needs and space |
| Space Efficiency | Can be very compact; designed for specific blade counts | Optimized for available space and blade collection |
| Protection | Often robust, with dedicated blade enclosures | Varies based on design and material choice |
| Accessibility | Quick retrieval with organized systems | Good, if designed with clear labeling and easy access |
| Time Investment | Minimal setup time | Significant time for planning and construction |
 A DIY wooden cabinet with pull-out trays for safe miter saw blade storage.
Top DIY Miter Saw Blade Storage Ideas
DIY miter saw blade storage offers personalized solutions that fit your workshop and blade collection. A pull-out tray cabinet, built from plywood, features shallow trays with custom cutouts for each blade, preventing contact and protecting them from dust. This design maximizes vertical space.
A vertical wall-mounted rack or cabinet is another practical option. This can be a plywood board with dados (grooves) for upright blade separation, or an enclosed cabinet with internal dividers. Some designs use a central rod through the arbor hole to secure multiple blades while maintaining separation. This storage type enhances visibility and quick selection.
For transporting blades, a DIY blade carrier is invaluable. It typically consists of two plywood plates separated by spacers, with a central threaded rod and wing nuts securing blades through their arbor holes. A handle allows for safe transport to job sites or sharpening services. Always label storage slots or blades for easy identification.
Safe Handling and Preparation for Storing Your Miter Saw Blades
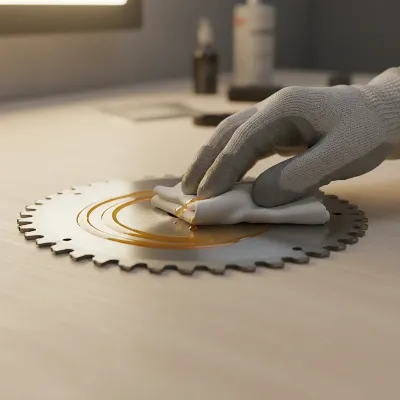
Before storing miter saw blades, proper preparation is essential for longevity and sharpness. Always prioritize safety by wearing gloves and handling blades by their body, avoiding cutting edges. Each blade must be thoroughly cleaned to remove sawdust, pitch, or resin using a stiff brush or specialized cleaner. This prevents moisture attraction and corrosion.
After cleaning, ensure the blade is completely dry to prevent rust. Air drying or wiping with a clean, dry cloth is effective. Finally, apply a thin, even coat of rust-preventative oil or paste wax, such as machine oil or silicon spray, to create a protective barrier against humidity. Wipe off any excess before storage. This protective layer is crucial for long-term storage, especially in humid environments.
Maintaining and Protecting Your Blades for Long-Term Storage
Long-term storage of miter saw blades requires ongoing maintenance and strategic protection. Regularly inspect stored blades for surface rust, especially in fluctuating humidity. Light rust can be removed with lubricant like WD-40 and a fine abrasive pad, followed by reapplication of a rust-preventative coating. For extended storage, reapply protective oil or wax every few months, particularly if workshop conditions change.
Environmental control is also vital. In high-humidity areas, place silica gel packs in sealed containers or use a workshop dehumidifier. Ensure your storage solution prevents direct blade contact through individual sleeves, dividers, or custom-cut slots to protect delicate carbide teeth from chipping or dulling. Diligent maintenance ensures blades perform optimally for years.
 Hand applying rust-preventative oil to a clean miter saw blade before storage.
Where to Find Materials and Supplies for Your DIY Storage
Sourcing materials for DIY miter saw blade storage is straightforward, with most items available at hardware stores, home improvement centers, or online. For the main structure, plywood is an excellent choice; Baltic birch offers stability, but standard ¾-inch or ½-inch construction-grade plywood also works well. Hardboard or MDF is ideal for custom cutouts and dividers due to its smooth surface and ease of cutting.
Essential hardware components include wood glue, screws (e.g., Kreg screws), and potentially drawer slides for pull-out trays. For blade carriers, a threaded rod (⅝-inch is common for 10-inch blades) with matching wing nuts and washers is needed. Acrylic sheets can be used for clear dividers. Don’t forget rust-preventative sprays, machine oil, or paste wax for blade preparation, and self-adhesive labels for organization, all found at hardware or automotive supply shops.
Conclusion
Safely storing your extra miter saw blades is a fundamental practice for any woodworker. It’s an investment in the longevity and performance of your tools, ensuring sharp edges, preventing rust, and maintaining the precision you rely on. By implementing thoughtful DIY storage solutions, whether it’s a pull-out tray cabinet, a vertical wall rack, or a portable blade carrier, you create an organized, efficient, and safer workspace. Remember to always clean and protect your blades before storage, and regularly inspect them for signs of wear or corrosion. A well-maintained blade is a reliable blade, ready to tackle your next project with accuracy and ease. What innovative storage ideas have you implemented in your own workshop to keep your blades in top condition?
Frequently Asked Questions
Frequently Asked Questions
How can I prevent rust on my miter saw blades in a humid environment?
To prevent rust in humid conditions, thoroughly clean and dry your blades, then apply a rust-preventative oil or wax. Store them in an airtight container with silica gel packs, or use a dehumidifier in your workshop. Vertical storage also promotes better airflow, reducing moisture buildup.
Is it better to store miter saw blades horizontally or vertically?
Vertical storage is generally preferred as it minimizes the risk of blades warping or bending, and prevents contact between teeth that can cause chipping. It also allows for better air circulation, which helps prevent moisture accumulation and rust.
What are some simple DIY materials for making blade dividers?
Simple DIY materials for blade dividers include thin plywood, hardboard, or even sturdy cardboard. Acrylic sheets can also be used for clear visibility. The key is to create separation between blades to prevent their teeth from striking each other.
How often should I clean my miter saw blades before storing them?
You should clean your miter saw blades every time you remove them from the saw before putting them into storage. This removes pitch and sawdust buildup that can attract moisture and accelerate corrosion, ensuring they are always ready for future use.
What are the benefits of a pull-out tray cabinet for blade storage?
A pull-out tray cabinet offers excellent protection by cradling each blade in custom cutouts, preventing contact and shielding them from dust and accidental bumps. This design also maximizes vertical space in your workshop, keeping blades completely enclosed and organized.
How to Store Your Miter Saw Blades Safely
Safely storing your miter saw blades involves proper cleaning, protection, and choosing an appropriate storage method to ensure their longevity and performance.
Prioritize safety by wearing gloves and handling the blade by its body. Remove any sawdust, pitch, or resin using a stiff brush or specialized blade cleaner. This step is crucial to prevent moisture attraction and corrosion.
Ensure the blade is completely dry after cleaning to prevent rust. Apply a thin, even coat of rust-preventative oil or paste wax to all blade surfaces. This creates a protective barrier against humidity, especially important for long-term storage.
Select a DIY storage solution such as a pull-out tray cabinet, a vertical wall-mounted rack, or a portable blade carrier. Ensure the chosen method provides individual protection for each blade to prevent contact and chipping of teeth.
Periodically inspect stored blades for any signs of surface rust or damage. Reapply protective coatings every few months, especially in humid environments. Consider using silica gel packs or a dehumidifier for environmental control.
Get our weekly buyer guide
Practical specs, not advice. Unsubscribe anytime.
I finally tackled my blade storage problem after reading about the pull-out tray cabinets. My old method of just stacking them in a drawer was terrible for the carbide teeth. This solution keeps them safe and makes it so much easier to find the right blade for the job. Definitely a game-changer for my small workshop!
My blades were always getting dull from just being tossed around, and I’ve had a few close calls with chipped teeth. Implementing one of these storage solutions has been fantastic. It’s so important to protect these precision tools, and now I feel much safer and more organized when I’m working on projects. Highly recommend taking the time to build one.
I tried one of the DIY ideas for blade storage, and while it’s better than nothing, I found that getting the spacing just right for different blade sizes was a bit fiddly. My 12-inch blades fit fine, but the smaller ones tend to wobble a bit. It does help with preventing damage, but I might need to tweak the design a little more for a perfect fit across all my blades.
The vertical wall-mounted rack idea was exactly what I needed. I was worried about rust and corrosion in my garage, and getting them off the workbench and properly secured has made a big difference. It was a pretty straightforward build, and now my blades are protected and my workspace feels a lot less cluttered. Good stuff.