To clean pitch and resin off miter saw blades for optimal performance, you must first unplug the saw and remove the blade, then soak it in a specialized blade cleaner or a household alternative like concentrated laundry detergent for 5 to 45 minutes. After soaking, scrub the blade thoroughly with a brass or plastic-bristled brush, rinse it under clean running water, and immediately dry it completely to prevent rust. This process restores blade sharpness, reduces friction, and ensures cleaner, more precise cuts.
Understanding Pitch and Resin Buildup
When cutting wood, especially resinous species like pine or sappy hardwoods, natural sap and pitch combine with fine sawdust and friction-generated heat, melting and bonding to your miter saw blade’s surfaces. This creates a sticky, hardened layer of residue on the teeth and gullets. Adhesives from plywood and engineered wood products also contribute to this tenacious buildup.
This accumulation significantly impacts your saw’s performance and longevity. A dirty blade increases resistance, forcing the saw’s motor to work harder and generating excessive heat. This heat causes wood to burn, the blade to dull faster, and leads to rougher, less precise cuts. Neglecting buildup can stress the saw’s motor and compromise the integrity of the blade’s carbide tips. Regularly removing pitch and resin ensures optimal miter saw operation, extending blade life and enhancing safety.
Essential Tools and Cleaning Solutions
Before cleaning, gather the right tools and select an effective cleaning solution. Prioritizing safety will protect you from sharp blade edges and cleaning chemicals.
Always wear sturdy work gloves and eye protection. You’ll need a shallow plastic tray or container large enough to submerge your miter saw blade without damaging its carbide tips. For scrubbing, a small brass or plastic-bristled brush is ideal for stubborn gunk on teeth and gullets without scratching. An old toothbrush can reach tighter areas, and a green scouring pad works well for flat surfaces. Have paper towels for drying, and optionally, an air compressor or blow dryer for thorough drying.
When it comes to cleaning solutions, you have several options:
- Commercial Blade Cleaners: Products like Rockler Pitch & Resin Remover, CMT Blade and Bit Cleaner, or Razorsaw Yanipika Blade and Tool Cleaner are highly effective, formulated to quickly dissolve stubborn pitch and resin.
- Household Alternatives:
- Simple Green Pro HD Heavy-Duty Cleaner: Effective and generally safe for metal surfaces when diluted. Use the Pro HD version for blades to avoid potential effects on carbide bonds.
- Concentrated Liquid Laundry Detergent: Mix a tablespoon or two with warm water in a shallow pan.
- Washing Soda (Sodium Carbonate): A powerful degreaser when mixed with water.
- Baking Soda and Boiling Water: For a gentler, non-toxic approach, pour boiling water over the blade in a pan, sprinkle baking soda, and let it soak.
- Dawn Dish Soap: A strong degreaser that, when mixed with water, can loosen lighter buildup.
- What to Avoid: Never use oven cleaner on saw blades. Harsh chemicals like lye can severely damage carbide tips and weaken brazing, leading to irreparable damage.
Step-by-Step Guide to Cleaning Your Miter Saw Blade
Cleaning your miter saw blade is a straightforward process that can significantly improve its performance and extend its lifespan. Follow these steps carefully to ensure a safe and effective cleaning experience.
Step 1: Prioritize Safety and Remove the Blade
|
Our Picks for the Best Miter Saw in 2026
As an Amazon Associate I earn from qualifying purchases.
|
||
| Num | Product | Action |
|---|---|---|
| 1 | Makita LS0816F 8-1/2” Slide Compound Miter Saw |

|
| 2 | HAUTMEC 14 Inch Clamping Miter Box with Adjustable Jaw & 4 Anti-Slip Clamps, Heavy Duty ABS Mitre Saw Box with 22.5°, 45°, 90° Cutting Angles for Woodworking, Trim, Frames, DIY Projects – HTHDM25036 |
|
| 3 | Seesii Mini Circular Saw with Laser Guide,4.8A 4000 RPM Compact Corded Circular Saw with Rip Guide,3 Blades (4-1/2") for Wood,Soft Metal,Tile,Plastic Cutting,Max Cut Depth 1-11/16"(90°),1-1/8" (45°) |
|
| 4 | WEN Universal Collapsible Miter Saw Stand, 350-Pound Capacity (MSA200) |
|
| 5 | Metabo HPT 12-Inch Compound Miter Saw | Xact Cut LED Shadow Line System | Dual Bevel | C12FDHB |
|
| 6 | Stanley 1-20-600 Saw Storage Miter Box with Saw, Black |
|
| 7 | Olson Saw 35-241 Fine Kerf Saw 35-550 42 tpi with Aluminum Thin Slot Miter Box, Slot Size .014-Inch, Slot Angles 45, 60, 90, Cutting Depth 7/8-Inch, Pack of 1 |
|
| 8 | SKIL 3601-02 Flooring Saw with 36T Contractor Blade, Red and black |
|
| 9 | Miter Saw Laser Guide - Miter and Portable Saw Laser Guide, Miter & Portable Saws |
|
| 10 | WEN MM0713 9.5-Amp 7.25-Inch Single Bevel Compact Sliding Compound Miter Saw with LED Cutline Guide, Black |
|
Your safety is paramount. Before touching your miter saw blade, always unplug the saw from its power source. This critical step prevents accidental startups. Refer to your miter saw’s instruction manual for safe blade removal, typically involving loosening an arbor nut while engaging a blade lock. Handle the blade with extreme caution, as teeth remain sharp.
Step 2: Prepare Your Cleaning Station
Find a well-ventilated area, preferably outdoors or in a workshop with good airflow. Lay down old newspapers or shop rags to protect your work surface. Place your shallow plastic tray or container on this protected surface to contain spills and organize your cleaning process.
Step 3: Soak the Blade
Carefully place the removed miter saw blade into the plastic tray, ensuring it lays flat. Pour your chosen cleaning solution into the tray, ensuring the entire blade, especially teeth and gullets, is submerged or well-coated. For concentrated liquid laundry detergent, a 50/50 mixture with warm water is effective. For commercial cleaners, follow manufacturer instructions. Allow the blade to soak for 5 to 45 minutes, or even overnight for baking soda solutions, depending on buildup severity. This soaking period allows the solution to penetrate and break down hardened pitch and resin.
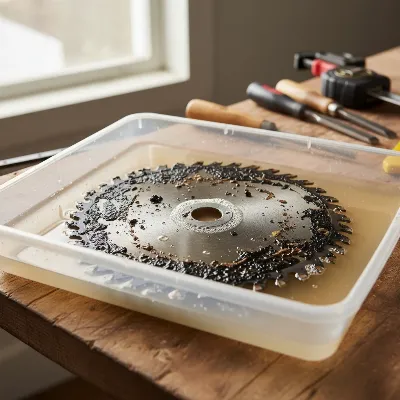 Miter saw blade soaking in a plastic tray with cleaning solution, ready for scrubbing
Step 4: Scrub Away the Buildup
After soaking, don safety gloves and eye protection. Using your brass-bristled brush, old toothbrush, or green scouring pad, scrub the blade. Focus on the teeth, working from back to front, and pay close attention to gullets where buildup accumulates most heavily. For flat surfaces, a scouring pad efficiently removes grime. Resin and pitch should come off easily after soaking. For stubborn spots, apply more cleaner and let it sit before scrubbing again. Be thorough but gentle to avoid damaging carbide tips.
Step 5: Rinse Thoroughly
Once all visible pitch and resin are removed, carefully take the blade out of the cleaning solution. Rinse it thoroughly under clean, running water. Ensure all traces of cleaning solution and dislodged grime are washed away from the blade’s surface and between the teeth. This step is crucial, as leftover cleaner can lead to corrosion or affect future cuts.
Step 6: Dry Completely and Protect
Immediately after rinsing, completely dry the blade to prevent rust. Use clean paper towels to pat down and wipe every surface. For hard-to-reach areas, compressed air or a blow dryer helps remove moisture. Once bone dry, apply a light coat of rust-inhibiting spray or a dry lubricant designed for saw blades. This protective layer prevents rust and reduces future pitch buildup, ensuring smoother operation. Once dry and protected, your miter saw blade is ready to be reinstalled or stored.
Advanced Tips for Stubborn Buildup
For extremely stubborn pitch and resin buildup, especially after extensive use with highly resinous woods or glues, advanced strategies may be necessary.
Firstly, a longer soaking time can be effective. If 10-45 minutes didn’t fully dissolve grime, extend the soak to a few hours or overnight with your preferred blade cleaner or concentrated laundry detergent. Regularly check the blade; if the solution becomes dark, replace it with fresh cleaner for improved effectiveness.
For particularly tough deposits, targeted scrubbing techniques make a difference. Use a small, stiff-bristled brush (like a brass brush or trimmed toothbrush) to meticulously clean each tooth individually, focusing on cutting edges and gullets. You can also carefully use a plastic scraper or old credit card to gently lift thicker, hardened globs of resin from flat surfaces before scrubbing.
Regarding specific chemical considerations, if commercial cleaners or common household options are insufficient, some woodworkers use Powdered Brewery Wash (PWB). PWB contains sodium metasilicate, found in some commercial blade cleaners, and effectively breaks down carbonized crud and tough resins. Always follow mixing instructions and wear appropriate personal protective equipment, as these products can be potent. Patience and persistence are key for challenging buildups.
Preventing Future Pitch and Resin Accumulation
Maintaining clean miter saw blades involves proactive prevention. Incorporating simple habits can significantly reduce pitch and resin buildup, extending deep cleaning intervals and prolonging blade life.
One effective prevention strategy is regular cleaning. Don’t wait until grime affects performance. A quick wipe-down with a rag and mild cleaner after each major project, or after a long session with resinous wood, prevents buildup from hardening.
After every cleaning, and especially before storing blades, consider applying a rust inhibitor or a dry lubricant. Products like Boeshield T-9 or specialized blade coatings create a slick barrier, reducing friction, minimizing heat, and making it harder for pitch and resin to adhere, allowing them to slough off more easily.
Furthermore, using appropriate blades for specific materials makes a difference. Blades designed for hardwoods often have different tooth geometries and coatings that resist resin better than general-purpose blades. Finally, proper storage is key. Store clean, dry, and protected blades in sleeves or dedicated holders in a dry environment to prevent moisture and dust accumulation, which can contribute to future issues.
When to Replace Your Miter Saw Blade
Understanding when to clean versus replace your miter saw blade is crucial for safety and optimal performance. A dirty blade can mimic a dull one, leading to premature replacement.
Consider cleaning your blade if you observe:
- Visible sticky residue on the blade body and between teeth.
- Burn marks on wood during cuts, even if the blade feels sharp.
- Increased effort required to push wood through the saw.
- Rougher cuts or more tear-out than usual.
However, clear signs indicate it’s time for a replacement, as cleaning won’t fix these issues:
- Missing Carbide Tips: If one or more carbide teeth are broken off, the blade is unbalanced and unsafe.
- Cracks in the Blade Body: Even small cracks can lead to catastrophic blade failure.
- Excessive Wobble or Runout: If the blade vibrates excessively or doesn’t spin true, it could indicate warping or damage to the arbor hole.
- Severely Dull or Chipped Teeth: If carbide tips are noticeably rounded, chipped, or have lost their edge, sharpening or replacement is necessary. For miter saw blades, sharpening can be costly, making replacement a more practical option for cheaper blades.
Prioritizing safety and work quality means knowing the difference between a blade needing a good clean and one that has reached the end of its useful life.
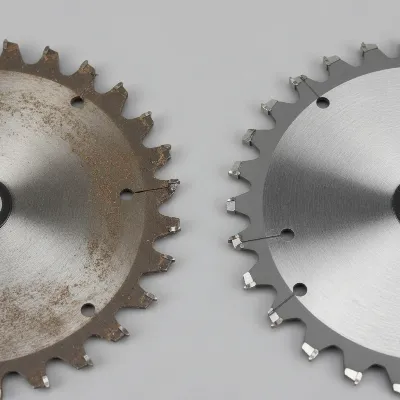 A worn miter saw blade with chipped carbide teeth next to a new, shiny miter saw blade, emphasizing replacement needs
Conclusion
Effectively cleaning pitch and resin from your miter saw blades is a simple yet impactful aspect of woodworking tool maintenance. By understanding what causes this sticky buildup and regularly employing the right cleaning techniques and solutions, you can significantly enhance your saw’s cutting performance, extend the lifespan of your blades, and ensure safer, cleaner results for every project. This proactive approach saves you both time and money, eliminating the frustration of burn marks and inefficient cuts. Don’t let a dirty blade hold back your craftsmanship. Embrace regular blade care, and you’ll find your miter saw operating with renewed power and precision. What difference has a clean blade made in your woodworking projects?
Frequently Asked Questions
Why is it important to clean pitch and resin from miter saw blades?
Cleaning pitch and resin from miter saw blades is crucial because buildup increases friction, causes burn marks on wood, dulls the blade faster, and forces the saw's motor to work harder. Regular cleaning ensures safer, cleaner, and more precise cuts, extending the blade's lifespan.
What household products can I use to clean my miter saw blade?
Effective household alternatives for cleaning miter saw blades include concentrated liquid laundry detergent mixed with warm water, washing soda (sodium carbonate) mixed with water, or a baking soda and boiling water solution. Dawn dish soap can also loosen lighter buildup. Always avoid harsh oven cleaners.
How long should I soak my miter saw blade in cleaning solution?
You should soak your miter saw blade in a cleaning solution for 5 to 45 minutes, depending on the severity of the buildup and the type of cleaner used. For very stubborn deposits or gentler solutions like baking soda, an overnight soak may be beneficial.
What are the signs that a miter saw blade needs to be replaced, not just cleaned?
A miter saw blade needs replacement if it has missing carbide tips, cracks in the blade body, excessive wobble or runout, or severely dull or chipped teeth. Cleaning will not resolve these structural or wear-related issues, which can compromise safety and performance.
How can I prevent pitch and resin from accumulating on my saw blades?
Prevent pitch and resin accumulation by regularly wiping down your blade after projects, applying a rust inhibitor or dry lubricant like Boeshield T-9, using appropriate blades for specific materials, and storing blades properly in a dry environment. These habits reduce friction and make buildup less likely.
Clean Your Miter Saw Blade
A step-by-step guide to safely and effectively clean pitch and resin from your miter saw blade, improving its performance and extending its lifespan.
Always unplug your miter saw from its power source before handling the blade to prevent accidental startups. Consult your saw's instruction manual for the correct procedure to safely remove the blade, typically involving loosening an arbor nut. Handle the blade with extreme caution due to its sharp teeth.
Set up in a well-ventilated area, preferably outdoors or in a workshop with good airflow. Lay down old newspapers or shop rags to protect your work surface. Place a shallow plastic tray or container on this protected surface to contain any spills during the cleaning process.
Carefully place the removed blade into the plastic tray, ensuring it lies flat. Pour your chosen cleaning solution, such as a commercial cleaner or diluted laundry detergent, over the blade until it is fully submerged. Allow the blade to soak for 5 to 45 minutes, or longer for stubborn buildup, to break down the hardened pitch and resin.
After soaking, wear safety gloves and eye protection. Use a brass-bristled brush, old toothbrush, or green scouring pad to scrub the blade, focusing on the teeth and gullets where buildup is heaviest. The pitch and resin should come off relatively easily. For stubborn spots, reapply cleaner and let it sit before scrubbing again.
Once all visible grime is removed, rinse the blade thoroughly under clean, running water to wash away all traces of the cleaning solution. Immediately dry the blade completely with paper towels to prevent rust. For hard-to-reach areas, use compressed air or a blow dryer. Consider applying a light coat of rust-inhibiting spray or dry lubricant for protection.
Get our weekly buyer guide
Practical specs, not advice. Unsubscribe anytime.
I used to just wipe my blades down, but the tip about soaking them in concentrated laundry detergent was a game-changer. My old pine-caked blade came out looking almost new after a good scrub with a brass brush. The cuts are noticeably smoother now, and it feels much safer to operate. Definitely worth the small effort.
I’ve always struggled with pitch buildup, especially when working with a lot of pressure-treated lumber. The suggestion to use a specialized blade cleaner really made a difference. I picked up one of the brands mentioned, and it cut through the gunk way better than anything else I’ve tried. My cuts are much cleaner now, which saves me a lot of sanding time.
The advice on drying the blade immediately after rinsing is crucial for preventing rust, which I appreciate. However, I found that 45 minutes of soaking was a bit too long for my general-purpose blade; it started to dull the finish slightly. Next time I’ll stick to the shorter end of the recommended soaking time, maybe 15-20 minutes, especially for less severe buildup.
My miter saw was starting to bog down, and I thought it was getting old. Turns out, it was just covered in resin from all the plywood projects. Following the steps here, especially the part about scrubbing the gullets, brought it back to life. The blade spins freely again, and my crosscuts are perfectly square. Huge improvement!